# Enable the EPEL REPO if you haven't already
sudo rpm -Uvh http://dl.fedoraproject.org/pub/epel/6/x86_64/epel-release-6-8.noarch.rpm

# Install the necessary packages
sudo yum install fuse sshfs -y
sudo modprobe fuse

# add modprobe fuse to the startup with rc.local to make sure the FUSE module is loaded upon a reboot
NEW_CONTENT="modprobe fuse"
FILEPATH="/etc/rc.local"
echo "`sudo cat $FILEPATH`
`echo $NEW_CONTENT`" | sudo tee $FILEPATH
Showing posts with label CentOs. Show all posts
Showing posts with label CentOs. Show all posts
CentOS 6.5 - Setup SSHFS

CentOS 6.5 - Compile PHP 5.5 For Threading
This tutorial step you through everything you need to do to get threading working in PHP on CentOS 6.5, and finishes off with a small threaded demonstration. It's quite long, but every step is incredibly simple, so don't be put off.
I see a lot of posts stating that PHP threading is not safe enough for production, but most of these are quite old. There is far more specific information about it actually being safe in the comments below. I will merge this info into this tutorial with time. Special thanks to Krakjoe for pointing this out and providing material.
Compiling Our Own PHP
To be able to perform multithreading (not multiprocessing, thats easy) in PHP, one needs to compile PHP from source with the --enable-maintainer-zts in the configure command.
Just keep running the the following commands one by one.
# Make sure your system is up-to-date!
yum update -y

# Install all the packages we are going to need
yum groupinstall "Development Tools" -y

yum install
wget \
libxml2-devel \
httpd-devel \
libXpm-devel \
gmp-devel \
libicu-devel \
t1lib-devel \
aspell-devel \
openssl-devel \
bzip2-devel \
libcurl-devel \
libjpeg-devel \
libvpx-devel \
libpng-devel \
freetype-devel \
readline-devel \
libtidy-devel \
libxslt-devel -y

# install epel repo
http://programster.blogspot.nl/2013/05/centos-6x-install-epel-repository.html
wget http://dl.fedoraproject.org/pub/epel/6/x86_64/epel-release-6-8.noarch.rpm
rpm -Uvh epel-*
rm epel-release-6-8.noarch.rpm -f

# install libmcrypt from epel repo
yum install libmcrypt-devel -y

# Download and extract the PHP source code.
wget -O php-5.5.13.tar.gz http://uk3.php.net/get/php-5.5.13.tar.gz/from/this/mirror
tar --extract --gzip --file php-5.5.13.tar.gz
cd php-5.5.13
Run just one of these commands. You pick!
cp php.ini-development /usr/local/lib/php.ini
cp php.ini-production  /usr/local/lib/php.ini
./configure \
--with-libdir=lib64 \
--prefix=/usr/local \
--with-layout=PHP \
--with-pear \
--with-apxs2 \
--enable-calendar \
--enable-bcmath \
--with-gmp \
--enable-exif \
--with-mcrypt \
--with-mhash \
--with-zlib \
--with-bz2 \
--enable-zip \
--enable-ftp \
--enable-mbstring \
--with-iconv \
--enable-intl \
--with-icu-dir=/usr \
--with-gettext \
--with-pspell \
--enable-sockets \
--with-openssl \
--with-curl \
--with-gd \
--enable-gd-native-ttf \
--with-jpeg-dir=/usr \
--with-png-dir=/usr \
--with-zlib-dir=/usr \
--with-xpm-dir=/usr \
--with-vpx-dir=/usr \
--with-freetype-dir=/usr \
--with-t1lib=/usr \
--with-libxml-dir=/usr \
--with-mysql=mysqlnd \
--with-mysqli=mysqlnd \
--with-pdo-mysql=mysqlnd \
--enable-soap \
--with-xmlrpc \
--with-xsl \
--with-tidy=/usr \
--with-readline \
--enable-pcntl \
--enable-sysvsem \
--enable-sysvshm \
--enable-sysvmsg \
--enable-shmop \
--enable-maintainer-zts

# compile!
make
Optional Step
You can run this command to check that everything is fine. When I ran this, I got some warnings/errors but the threading still worked. This just emphasised to me that this probably should not be used for production purposes but good for fun.make test
One last command!
make install
Threading!
This point on is specific to threading, so if you just wanted to roll your own PHP, you can stop here
Install the pthreads extension
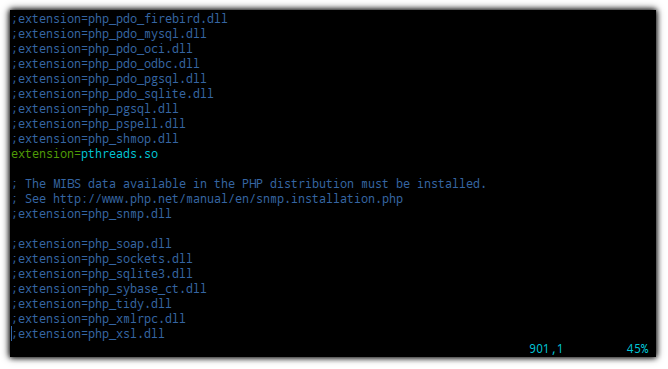
pecl install pthreadsAdd the following line to your php.ini at
/usr/local/lib/php.ini
extension=pthreads.so
Test It!
Now lets test that threading has actually been implemented. Copy the following script into a file called script.php
<?php

# This is a slightly tweaked version of a script found at below:
# http://forums.devshed.com/php-development-5/multithreading-php-948403.html

# class for sharing data between threads.
class Foo extends Stackable
{
    public $counter;

    public function __construct()
    {
        $this->counter = 0;
    }

    public function run(){}
}

class Process extends Worker
{
    private $text = "";

    public function __construct($text, $shared_obj)
    {
        $this->text       = $text;
        $this->shared_obj = $shared_obj;
    }

    public function run()
    {
        while ($this->shared_obj->counter < 100)
        {
            $this->shared_obj->counter++;
            print "thread " . $this->text . ": " . $this->shared_obj->counter . PHP_EOL;
            usleep(rand(10,1000));
        }
    }
}

$foo = new Foo();

$a = new Process("A", $foo);
$a->start();

$b = new Process("B", $foo);
$b->start();

# Wait for the threads to finish before continuing.
# This simulates waiting for a result that the
# threads come up with between them
$a->join();
$b->join();
print "Done!" . PHP_EOL;
Now run the script with the following command:
php script.php
Explanation
You just spawned 2 threads which shared a single counter. Each thread would increment the counter before going to sleep for a random amount of time. When the counter finally reaches 100, each thread would finish. The program that called the threads waited for them to finish before printing that it has finished. This is the point where you would do something with a value the threads had generated etc. If you run the script multiple times, you will see different output to prove the counter is shared between the threads.
One could launch change the while condition in the threads to "true" and remove the sleep call. Then run htop in another shell/screen and launch the script in order to see two CPU threads run at 100%, further proving the threading aspect. The fact that the counter is shared shows that this is not a case of multiprocessing.
Your Thoughts
Did you have difficulty or do you think something was missing? Perhaps you have more info that you think would benefit others, or you have a tutorial request? Please take the time to comment below.
References
CentOS 6.5 - Permanently Set DNS
Specify the IP of the nameserver in your resolv.conf file. I have used Google's 8.8.8.8 address as an example.
echo 'nameserver $DNS_IP_ADDRESS' | sudo tee /etc/resolv.conf
Prevent your DNS settings from being replaced by your DHCP server/router DNS setting upon reboot.
echo "`cat /etc/sysconfig/network`
PEERDNS=no" | sudo tee /etc/sysconfig/network
CentOS - Set up Your Own Mirror
By setting up your own repository you can install CentOS with a netinstall ISO incredibly quickly. In fact, when combined with a kickstart script, I have found that a full install can be set up in less than 1 minute!
This post is aimed at UK netizens (using UK repos), but you can easily change the paths to the repos you pull from a location closer to you.
Steps
First you will need to set up a webserver, so that people can browse to your mirror over http:
yum install httpd
Create a directory where you want your downloaded files to go into. Please note, this directory needs to be accessible from your webserver, so either make sure to use a directory within the webservers default directory, or reconfigure your apache configuration
rsync -avrt --delete --exclude "isos" --copy-links \
rsync://mirrorservice.org/mirror.centos.org/ $PATH_TO_STORAGE_DIR
Please note, that for the 5/ and 6/ directories to work (which always point to the latest release, then the --copy-links absolutely has to be in that instruction. To only sync these
If you just want certain directories, it may be easier to run multiple commands like so:
rsync -avrt --delete --exclude "isos" --copy-links \
rsync://mirrorservice.org/mirror.centos.org/6/ [LOCAL-DIRECTORY-PATH]/6/
rsync -avrt --delete --exclude "isos" --copy-links \
rsync://mirrorservice.org/mirror.centos.org/5/ [LOCAL-DIRECTORY-PATH]/5/
rsync://mirrorservice.org/mirror.centos.org/6/ [LOCAL-DIRECTORY-PATH]/6/
rsync -avrt --delete --exclude "isos" --copy-links \
rsync://mirrorservice.org/mirror.centos.org/5/ [LOCAL-DIRECTORY-PATH]/5/
Centos 6.5 - Install OpenVZ
Introduction
OpenVZ has a couple of advantages over Xen. It has proved easier to set up the host so far and pretty quick to set up each virtual machine (no need to run an install process and worry about who/where/how the domU’s kernels are booting). The main advantage that I have read about so far is the ability to set allocated memory on openvz and not allow clients to spill out into swap space which kills disk IO for everyone else (which can happen in Xen). It is not a ‘true’ hypervisor (and thus cannot run windows), but has less overheads and is extremely fast and efficient.
Install Script
Copy and paste the following script into a file and execute it. Read all the output/echo statements if you want to know what it's doing.
#!/bin/bash

# BASH guard
if ! [ -n "$BASH_VERSION" ];then
    echo "this is not bash, calling self with bash....";
    SCRIPT=$(readlink -f "$0")
    /bin/bash $SCRIPT
    exit;
fi

clear
echo 'Installing OpenVZ...'

echo "updating..."
yum update -y

echo 'installing wget...'
yum install wget -y

echo 'Adding openvz Repo...'
cd /etc/yum.repos.d
wget http://download.openvz.org/openvz.repo
rpm --import http://download.openvz.org/RPM-GPG-Key-OpenVZ

echo 'Installing OpenVZ Kernel...'
yum install -y vzkernel

echo 'Installing additional tools...'
yum install vzctl vzquota ploop -y

echo 'Changing around some config files..'
sed -i 's/kernel.sysrq = 0/kernel.sysrq = 1/g' /etc/sysctl.conf

echo "Setting up packet forwarding..."
sed -i 's/net.ipv4.ip_forward = 0/net.ipv4.ip_forward = 1/g' /etc/sysctl.conf

# With vzctl 4.4 or newer there is no need to do manual configuration. Skip to #Tools_installation.
# source: http://openvz.org/Quick_installation
#echo 'net.ipv4.conf.default.proxy_arp = 0' >> /etc/sysctl.conf
#echo 'net.ipv4.conf.all.rp_filter = 1' >> /etc/sysctl.conf
#echo 'net.ipv4.conf.default.send_redirects = 1' >> /etc/sysctl.conf
#echo 'net.ipv4.conf.all.send_redirects = 0' >> /etc/sysctl.conf
#echo 'net.ipv4.icmp_echo_ignore_broadcasts=1' >> /etc/sysctl.conf
#echo 'net.ipv4.conf.default.forwarding=1' >> /etc/sysctl.conf


echo "Allowing multiple subnets to reside on the same network interface..."
sed -i 's/#NEIGHBOUR_DEVS=all/NEIGHBOUR_DEVS=all/g' /etc/vz/vz.conf
sed -i 's/NEIGHBOUR_DEVS=detect/NEIGHBOUR_DEVS=all/g' /etc/vz/vz.conf

echo "Setting container layout to default to ploop (VM in a file)..."
sed -i 's/#VE_LAYOUT=ploop/VE_LAYOUT=ploop/g' /etc/vz/vz.conf

echo "Setting Ubuntu 12.04 64bit to be the default template..."
sed -i 's/centos-6-x86/ubuntu-12.04-x86_64/g' /etc/vz/vz.conf

echo 'Purging your sys configs...'
sysctl -p

echo "Disabling selinux..."
sed -i 's/SELINUX=enforcing/SELINUX=disabled/g' /etc/sysconfig/selinux

echo "disabling iptables..."
/etc/init.d/iptables stop && chkconfig iptables off

clear

echo "OpenVZ Is now Installed. "
echo "Please reboot into the openvz kernel to start using it."
echo "Programster"
This script was last tested on the 15th August 2014
Start Your First Container
Create a virtual machine with a command like such (I build command in an sh file before running)
vzctl create $unique-id-for-vm \
--ostemplate $template-name-here \
--conf $configuration-name-here \
--ipadd $ip-address-of-vm \
--onboot yes \
--hostname $hostname-of-vm
Here is an example already filled out:
vzctl create 101 \
--ostemplate centos-6-x86_64 \
--conf basic \
--ipadd 192.168.1.43 \
--hostname centos1
OR
vzctl create 101 \
--ostemplate ubuntu-14.04-x86_64 \
--conf basic \
--ipadd 192.168.1.43 \
--hostname ubuntu1
The root password will be the same as the host machine unless you change it using passwd inside the machine, or by issuing the following command:
vzctl set {CTID} --userpasswd {user}:{password} --save
To start the virtual machine that you have created, run:
vzctl start
The machine could automatically connect to google dns (8.8.8.8) but had to manually set nameserver.
echo nameserver 8.8.8.8 > /etc/resolv.conf
Restart the network for the nameserver to take effect:
service network restart
References
Centos - Fix slow ssh login
Introduction
If you've noticed that it takes a significant amount of time to recieve the login prompt when using SSH to access a CentOS server, you can follow the steps below to make it immediate.
Please note that testing/development of this material was done with a minimal net install of Centos 6.3
Solution
Edit the
/etc/ssh/sshd_config
file and change GSSAPIAuthentication yes to GSSAPIAuthentication no
Also change UseDNS to explicitly no by running the following commands/script.
SEARCH="#UseDNS yes"
REPLACE="UseDNS no"
FILEPATH="/etc/ssh/sshd_config"
sed -i "s;$SEARCH;$REPLACE;" $FILEPATH
Then restart the ssh daemon for it to take effect:
sudo service sshd restart
That was it! Now you can exit your ssh connection before relogging in and you will notice that you get an immediate request for your password.
References
Delayed SSH login on Centos 6CentOS 5.8 Mounting External NTFS Hard Drive
1. Use the following command to find out what device the drive is:
fdisk -l
It's usually one letter in alphabet after your last known drive, i.e. if you just have one physical drive which things are installed to, then that is probably sda, and the external drive is sdb.
Note: If you don't have fdisk, run the command:
yum install util-linux
2. To mount NTFS filesystems, you need to add the rpmforge repository. For 32bit systems this can be done with the following commands:
wget http://packages.sw.be/rpmforge-release/rpmforge-release-0.3.6-1.el5.rf.i386.rpm
rpm -Uhv rpmforge-release-0.3.6-1.el5.rf.i386.rpm
3. Install NTFS-3G using this YUM command:
yum install fuse fuse-ntfs-3g dkms dkms-fuse
4. Make a directory where you want to mount the drive. I did it like so:
mkdir /mnt/external_hard_drive
5. Use the mount command to mount the filesystems:
mount -t ntfs-3g /dev/sdb1 /mnt/external_hard_drive
Subscribe to:
Posts
(
Atom
)