Showing posts with label PHP. Show all posts

PHP - Including External Packages

To build complex applications in PHP, it is much quicker and simpler to just "glue together" relevant packages and configure them.

Related Posts

Steps

    Navigate to the root of your project's directory, or just create a new directory if you are starting from scratch.
    mkdir -p /path/to/project/directory
    cd /path/to/project/directory
    
    Create a composer.json file, listing all the packages that you require. If you are hosting your own private repository using Satis, you will need to list this as well using the
    repositories
    section as I have done below.
    {
        "repositories": [ { "type": "composer", "url": "http://satis.technostu.com/" } ],
        "require": {
            "Programster/CoreLibs": "dev-trunk",
            "Programster/CliMenu": "1.0.0",
            "Programster/DigitalOceanSdk": "2.*"
        }
    }
    
    Download all the packages using composer.
    composer update
    Running composer update again later may result in packages updating, especially if you use versions like
    dev-trunk
    or
    2.*
    , so using specific versions like
    1.0.0
    is somewhat safer!

Get Started with Satis Using Docker

This tutorial has moved.

Private PHP Packages - Setup Your Own Satis Server

Previously, we created a PHP "package", but this is useless unless we host it on Packagist, or set up our own private server for referencing them, which is what I will now show you how to do, using Satis.

Related Posts

Steps

    Install all the necessary packages.
    sudo apt-get install apache2 libapache2-mod-php5 php5 php5-cli subversion -y
    Navigate to your web folder and give yourself permission to write there.
    sudo chown $USER:www-data /var/www
    cd /var/www
    Install composer
    curl -sS https://getcomposer.org/installer | php
    Now you will see a directory called satis in /var/www
    Now install satis using composer.
    php composer.phar create-project composer/satis --stability=dev --keep-vcs
    create a file called satis.json containing all the configuration details for the packages you desire
    {
        "name": "MyDomain Packages",
        "homepage": "http://www.mydomain.com",
        "repositories": [
            {
                "type": "svn",
                "url": "svn://svn.mydomain.com/packages/CoreLibs"
            },
            {
                "type": "svn",
                "url": "svn://svn.mydomain.com/packages/Package2"
            },
            {
                "type": "svn",
                "url": "svn://svn.mydomain.com/packages/Package3"
            }
        ],
        "require-all": true
    }
    
    Now build the package list. You will need to enter your SVN username/password.
    php satis/bin/satis build satis.json .

    Configure Apache

    We need to update Apache to point to the correct directory, which is now /var/www instead of the default /var/www/html (in Ubuntu 14.04).
    sudo editor /etc/apache2/sites-enabled/000-default.conf

    [ Change DocumentRoot to /var/www ]
    Restart Apache for the changes to take effect.
    sudo service apache2 restart
    That's it! Your Satis server is now at this server's IP/domain. Now you just need to configure your firewall rules with UFW or IPtables, or even configure an Nginx reverse proxy to only allow/forward the IPs that you specify, so that only you can access the Satis server, unless you want to keep your packages open to the public.

References

Creating A PHP Package

You may or may not already be using Packagist in order to create PHP packages. By converting your code into packages, it becomes faster and simpler to develop more complex applications. Since these packages will be re-used, less time will be spent writing and debugging "new" code. One of the best aspects of packages is that they can automatically updated through Composer with a call to

composer update
. This tutorial is going to cover the creation of a "package" repository in SVN that we will reference with a private Satis server, rather than using Packagist ion order to keep our packages private.

Related Posts

Steps

    Create a new repository on your SVN server
    svnadmin create my-repo
    Check the new repository out
    svn checkout svn://my.domain.com/my-repo
    Navigate to within the directory that was just checked out and create the default folders that are expected by the package program trunk,branches, and tags
    cd my-repo
    mkdir trunk
    mkdir branches
    mkdir tags
    Create the src directory this will be referenced later.
    mkdir trunk/src
    Create the composer.json file which provides all the relevant packaging details This must go in the top level of the codebase (e.g. top of trunk or any branch)
    editor trunk/composer.json

    Template

    {
        "name": "[vendor name]/[package name]",
        "type": "library",
        "description": "[description]",
        "keywords": ["log","logging"],
        "homepage": "[project homepage]",
        "license": "none",
        "authors": [
            {
                "name": "[author name]",
                "email": "[author email]",
                "homepage": "[authors website]",
                "role": "[authors role]"
            }
        ],
        "require": {
            "php": ">=5.x.x"
        },
        "autoload": {
            "psr-4": {
                "[vendor name]\\[package name]\\": ""
                "[vendor name]\\[package name]\\": "subfolder1",
                "[vendor name]\\[package name]\\": "subfolder2"
            }
        }
    }
    

    Example

    {
        "name": "Programster/CoreLibs",
        "type": "library",
        "description": "Core libraries for PHP 5.3+",
        "keywords": ["core","library"],
        "homepage": "http://www.programster.blogspot.co.uk",
        "license": "none",
        "authors": [
            {
                "name": "Programster",
                "email": "my.email@gmail.com",
                "homepage": "http://programster.blogspot.co.uk/",
                "role": "Developer"
            }
        ],
        "require": {
            "php": ">=5.3.0"
        },
        "autoload": {
            "psr-4": {
                "Programster\\CoreLibs\\": ""
            }
        }
    }
    
    Add everything to SVN and commit it
    svn add *
    svn commit .
    
    Now all you have to do is add all the actual source code to the trunk directory and commit to SVN!

References

CentOS 6.5 - Compile PHP 5.5 For Threading

This tutorial step you through everything you need to do to get threading working in PHP on CentOS 6.5, and finishes off with a small threaded demonstration. It's quite long, but every step is incredibly simple, so don't be put off.

I see a lot of posts stating that PHP threading is not safe enough for production, but most of these are quite old. There is far more specific information about it actually being safe in the comments below. I will merge this info into this tutorial with time. Special thanks to Krakjoe for pointing this out and providing material.

Compiling Our Own PHP

To be able to perform multithreading (not multiprocessing, thats easy) in PHP, one needs to compile PHP from source with the --enable-maintainer-zts in the configure command.

Just keep running the the following commands one by one.

# Make sure your system is up-to-date!
yum update -y

# Install all the packages we are going to need
yum groupinstall "Development Tools" -y

yum install 
wget \
libxml2-devel \
httpd-devel \
libXpm-devel \
gmp-devel \
libicu-devel \
t1lib-devel \
aspell-devel \
openssl-devel \
bzip2-devel \
libcurl-devel \
libjpeg-devel \
libvpx-devel \
libpng-devel \
freetype-devel \
readline-devel \
libtidy-devel \
libxslt-devel -y

# install epel repo 
http://programster.blogspot.nl/2013/05/centos-6x-install-epel-repository.html
wget http://dl.fedoraproject.org/pub/epel/6/x86_64/epel-release-6-8.noarch.rpm
rpm -Uvh epel-* 
rm epel-release-6-8.noarch.rpm -f

# install libmcrypt from epel repo
yum install libmcrypt-devel -y

# Download and extract the PHP source code.
wget -O php-5.5.13.tar.gz http://uk3.php.net/get/php-5.5.13.tar.gz/from/this/mirror
tar --extract --gzip --file php-5.5.13.tar.gz
cd php-5.5.13

Run just one of these commands. You pick!

cp php.ini-development /usr/local/lib/php.ini
cp php.ini-production  /usr/local/lib/php.ini

./configure \
--with-libdir=lib64 \
--prefix=/usr/local \
--with-layout=PHP \
--with-pear \
--with-apxs2 \
--enable-calendar \
--enable-bcmath \
--with-gmp \
--enable-exif \
--with-mcrypt \
--with-mhash \
--with-zlib \
--with-bz2 \
--enable-zip \
--enable-ftp \
--enable-mbstring \
--with-iconv \
--enable-intl \
--with-icu-dir=/usr \
--with-gettext \
--with-pspell \
--enable-sockets \
--with-openssl \
--with-curl \
--with-gd \
--enable-gd-native-ttf \
--with-jpeg-dir=/usr \
--with-png-dir=/usr \
--with-zlib-dir=/usr \
--with-xpm-dir=/usr \
--with-vpx-dir=/usr \
--with-freetype-dir=/usr \
--with-t1lib=/usr \
--with-libxml-dir=/usr \
--with-mysql=mysqlnd \
--with-mysqli=mysqlnd \
--with-pdo-mysql=mysqlnd \
--enable-soap \
--with-xmlrpc \
--with-xsl \
--with-tidy=/usr \
--with-readline \
--enable-pcntl \
--enable-sysvsem \
--enable-sysvshm \
--enable-sysvmsg \
--enable-shmop \
--enable-maintainer-zts

# compile!
make

Optional Step

You can run this command to check that everything is fine. When I ran this, I got some warnings/errors but the threading still worked. This just emphasised to me that this probably should not be used for production purposes but good for fun.
make test

One last command!

make install

Threading!

This point on is specific to threading, so if you just wanted to roll your own PHP, you can stop here


Install the pthreads extension

pecl install pthreads
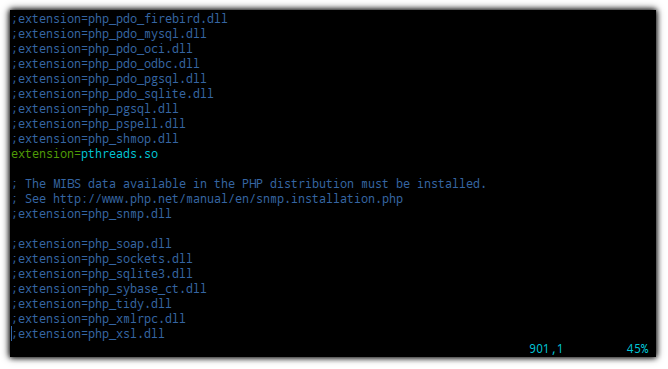
Add the following line to your php.ini at
/usr/local/lib/php.ini
extension=pthreads.so
Test It!

Now lets test that threading has actually been implemented. Copy the following script into a file called script.php

<?php

# This is a slightly tweaked version of a script found at below:
# http://forums.devshed.com/php-development-5/multithreading-php-948403.html

# class for sharing data between threads.
class Foo extends Stackable 
{
    public $counter;

    public function __construct()
    {
        $this->counter = 0;
    }

    public function run(){}
}

class Process extends Worker 
{
    private $text = "";

    public function __construct($text, $shared_obj)
    {
        $this->text       = $text;
        $this->shared_obj = $shared_obj;
    }

    public function run()
    {
        while ($this->shared_obj->counter < 100)
        {
            $this->shared_obj->counter++;
            print "thread " . $this->text . ": " . $this->shared_obj->counter . PHP_EOL;
            usleep(rand(10,1000));
        }
    }
}

$foo = new Foo();

$a = new Process("A", $foo);
$a->start();

$b = new Process("B", $foo);
$b->start();

# Wait for the threads to finish before continuing. 
# This simulates waiting for a result that the
# threads come up with between them
$a->join();
$b->join();
print "Done!" . PHP_EOL;

Now run the script with the following command:

php script.php

Explanation

You just spawned 2 threads which shared a single counter. Each thread would increment the counter before going to sleep for a random amount of time. When the counter finally reaches 100, each thread would finish. The program that called the threads waited for them to finish before printing that it has finished. This is the point where you would do something with a value the threads had generated etc. If you run the script multiple times, you will see different output to prove the counter is shared between the threads.


One could launch change the while condition in the threads to "true" and remove the sleep call. Then run htop in another shell/screen and launch the script in order to see two CPU threads run at 100%, further proving the threading aspect. The fact that the counter is shared shows that this is not a case of multiprocessing.

Your Thoughts

Did you have difficulty or do you think something was missing? Perhaps you have more info that you think would benefit others, or you have a tutorial request? Please take the time to comment below.

References

Install SSH2 Extension Through PECL (Ubuntu 12+)

I am working on an application that interfaces with remote servers through SSH so of course I need the ssh2 extension installed. I am currently running 5.5 from a previous tutorial, but this should work in the 'traditional' php installed through sudo apt-get install php5-cli.

    sudo apt-get install libssh2-1 libssh2-1-dev
    sudo pecl install ssh2 channel://pecl.php.net/ssh2-0.11.3
    If you read the last bit of text from the previous step, you will notice that the last instruction states: "You should add "extension=ssh2.so" to php.ini", so now you should add that to your php ini files.
    sudo vim /etc/php5/cli/php.ini
    Find the header "Dynamic Extensions" and place extension=ssh2.so directly below as shown here.


    [Don't worry if you don't have that "mongo.so" bit, that's just another extension I have.]
    Now do the same for apache (if you want it there that is)
    sudo vim /etc/php5/apache2/php.ini
    Repeat the previous step (add the .so line), before saving and running the following command.
    sudo service apache2 restart

References