Showing posts with label filesystems. Show all posts

Getting Started With XFS RAID 0

XFS is a filesystem that excels in execution of parallel input/output (I/O) operations, and thus focuses on increased performance with scalability. Many benchmarks have shown that traditional EXT4 is better when using a single drive, however XFS will perform better as you add more drives to the filesystem.

Don't forget that RAID 0 is at a block-level, not a file level which is an important subtlety that explains how IOPS (not just bandwidth) can scale up as drives are added

Steps

Create lvm2 physical volume partitions on each of your physical drives. For this I used gparted.

Now run the following commands, ensuring to replace the [x] with the appropriate drive letters and any variables being denoted with $

sudo apt-get install xfsprogs -y
sudo vgcreate $VG_NAME /dev/sd[x]1 /dev/sd[x2]1 ...
lvcreate -i$NUM_DRIVES -I4 -l100%FREE -n$LV_NAME $VG_NAME
sudo mkfs.xfs /dev/$VG_NAME/$LV_NAME

You now have a RAID 0 volume. At this point it is probably a good idea to configure fstab to automatically mount your volume somewhere on boot.


Using Mdadm Instead

When I was initially creating this tutorial, I started with using software raid through mdadm. However, whenever I rebooted my computer, the raid would disappear as if it never existed. Here is how I did it for reference:

Below are the steps I ran to setup on ubuntu 14.04. Please remember to replace[x] and [x2] with the representative letters for specifying your physical drives. You can always find these out by using gparted.

# Install the necessary packages
sudo apt-get install xfsprogs mdadm -y

# Create the RAID 0 array.
mdadm --create --verbose /dev/md0 --level=stripe --raid-devices=2 /dev/sd[x] /dev/sd[x2]

# Create the XFS filesystem
sudo mkfs.xfs /dev/md0

Ubuntu - Setting up an NFS (Server and Client)

What is NFS?

"NFS stands for Network File System, a file system developed by Sun Microsystems, Inc. It is a client/server system that allows users to access files across a network and treat them as if they resided in a local file directory"

"The NFS protocol is designed to be independent of the computer, operating system, network architecture, and transport protocol. This means that systems using the NFS service may be manufactured by different vendors, use different operating systems, and be connected to networks with different architectures. These differences are transparent to the NFS application, and thus, the user. "
[ source ]

Host Installation Steps

To set up an NFS host in Ubuntu, you need to run the following command to install the necessary packages:

sudo apt-get install nfs-kernel-server nfs-common -y

Add lines to your

/etc/exports file
, specifying the directory locations that you want shared on the network like below:
sudo $EDITOR /etc/exports

Here's another example with comments explaining each part.

# Share the top level 'files' directory
# Allow access from computers accessing from the IPs in the range of 192.168.1.1 -> 192.168.1.255
# The client can access/edit files as if they were a root user on the host
# Grant both read and write access (rw)
/files 192.168.1.1/24(rw,no_root_squash,async)
If you want to allow read only access, you need to specify "ro", not just "r"
You cannot export encrypted directories. This means that if you selected "encrypt home directory" during your Ubuntu installation, you cannot export your home directory, or any of its subdirectories.

root_squash or no_root_squash?

The option 'root_squash' prevents root users connected remotely from having root privileges and assigns them the nfsnobody user ID. This effectively "squashes" the power of the remote root user to the lowest local user, preventing unauthorized alteration of files on the NFS host.

The alternative option 'no_root_squash', allows the root user on the client to access/create files as root on the NFS host which is dangerous, so don't enable this unless you know that you need to. Typically this is needed if one is hosting root filesystems on an NFS server for diskless clients (e.g. AWS EC2).

async or sync?

Async mode (which is the default) means that the system will reply to a client's write request, stating that it has completed, as soon as it has handled the request by passing it off to the filesystem to manage, rather than waiting for it to be written to stable storage (e.g. replying as soon as it has gone into cache rather than disk). This yields much better performance at the expense in a risk of data corruption should the server reboot or lose power whilst still holding data in cache.

If your system needs to work with other proprietary systems that work with NFS (Solaris, HP-UX, RS/6000, etc.), you will need to enable sync mode.

subtree_check or no_subtree_check?

There is a great explanation of this here, but to sum up, the subtree_check causes the host to check that a client request is not going outside the domain of the exported directory. This is only necessary when you are exporting a subdirectory within a filesystem and not the entire filesystem. However, this can cause issues, so the best choice of action is this: always use no_subtree_check (the default), and if you are making a public NFS, then set up the disk partitions so that you are only ever exporting entire filesystems.

Applying Export Changes

Whenever you make changes to the /etc/exports file, for them to take effect you need to run the following command which will let you know if there are any issues, and tell you about any defaults it assumes.

sudo exportfs -a

Restart NFS Service

You can restart the NFS service at any point with the following command:

sudo /etc/init.d/nfs-kernel-server restart

Client Steps

To be able to mount NFS shares as a client, you need to run the following command to install the relevant packages:

sudo apt-get install nfs-common -y

Mount the NFS by adding a line to your /etc/fstab file like below:

$NFS_HOST_IP:$HOST_EXPORT_DIR_PATH $LOCAL_DIR nfs auto 0 0
The last 0 indicates that we should never perform filesystem checks for this on boot (fsck).

Now run the following command to mount everything in your fstab.

sudo mount -a

If you just want to mount once, and not automatically on startup, then instead of adding to your fstab and calling mount -a, simply run this instead:
sudo mount $NFS_HOST_IP:$HOST_EXPORT_DIR_PATH $LOCAL_DIR

References

Ubuntu 12.04 - ZFS Getting Started

Update 1st May 2017

This tutorial is way out of date as you should not be using Ubuntu 12.04 any more. However, I am leaving it here in case parts of it may be useful for later versions of Ubuntu.

ZFS is a combined file system and logical volume manager designed by Sun Microsystems. I discovered it in my quest to find out about BTRFS. People are stating that BTRFS is superior to ZFS, but BTRFS is not yet considered stable, so in the meantime I am using ZFS. In this tutorial we will be playing with ZFS in order to demonstrate its snapshot/restore capability.

Installation

    Lets install all the packages we need as well as updates to the kernel.
    sudo apt-get install python-software-properties
    sudo apt-add-repository ppa:zfs-native/stable -y
    sudo apt-get update && sudo apt-get install ubuntu-zfs -y
    
    You just updated the kernel with some modules, so you need to reboot.
    Now run the following command to ensure that ZFS has been set up.
    dmesg | grep ZFS
    If everything went ok, you will see output like below. If something went wrong, you will get no output.

Setting Up

    Now lets create some virtual block devices on which we will set up the ZFS filesystem. If you have some spare hard drives or SSDs plugged in, then you do not need to do this. Create a directory to put the virtual device(s) in:
    VIRT_DEVICE_DIR=/virt-devices
    sudo mkdir $VIRT_DEVICE_DIR
    
    Create a 100GB "sparse" image to play with:
    sudo dd if=/dev/zero of=$VIRT_DEVICE_DIR/1.img bs=1k count=1 seek=100M
    
    Create a ZFS pool with just this one device
    POOL_NAME=vol0
    sudo zpool create $POOL_NAME $VIRT_DEVICE_DIR/1.img
    
    Check the status
    sudo zpool list
    
    sudo zpool status
    
    Now lets mount this filesystem somewhere so that we can add files to it.
    MOUNT_POINT=/mnt/data
    DATASET_NAME=data
    sudo zfs create -o mountpoint=$MOUNT_POINT $POOL_NAME/$DATASET_NAME
    
    Set the mount point to be owned by ourselves so that we can place files within it.
    sudo chown $USER $MOUNT_POINT
    Test that the dataset was created with:
    sudo zfs list

Playing with Snapshots

Now that we have created our ZFS filesystem, we can take advantage as what I see as ZFS's main feauture, the ability to take instant snapshots.

    First create a file to check later.
    echo "my data" > $MOUNT_POINT/my-file.txt
    
    To see whether snapshots show in the results of zfslist run:
    sudo zpool get listsnapshots $POOL_NAME
    
    By default, the display of snapshots is disabled. The following command enables it:
    sudo zpool set listsnapshots=on $POOL_NAME
    
    The following command disables it if you want to change back later:
    sudo zpool set listsnapshots=off $POOL_NAME
    
    Now take a snapshot
    SNAPSHOT_NAME=snapshot1
    sudo zfs snapshot $POOL_NAME/$DATASET_NAME@$SNAPSHOT_NAME
    
    Now you should see the snapshot when you perform a zfs list:
    sudo zfs list
    
    Now to test the snapshot works, lets change the contents of the file we created just before taking the snapshot.
    echo "data changed" > $MOUNT_POINT/my-file.txt
    cat $MOUNT_POINT/my-file.txt
    
    Rollback to the snapshot:
    sudo zfs rollback $POOL_NAME/$DATASET_NAME@$SNAPSHOT_NAME
    
    Check the contents of the file:
    cat /mnt/data/my-file.txt
    
    If you got the message "my data" instead of "data changed" then everything went successfully! You now have a way to instantly restore your filesystem to points in time.

References

Ubuntu - Using Fstab to Automatically Mount Drives

Automatically mounting disk drives saves a lot of hassle, especially if you are using them for a home NFS storage system. This tutorial will show you how to set up Ubuntu to automatically mount the drives by UUID so that if you were to swap the sata cables or the drives around, it wouldn't matter, the correct drive will get mounted to the correct folder.

    The first thing you need to do is create an empty directory where you want the drive to appear. E.g. I want my drive to be accessed from a directory called extra_storage in my home folder, so I am going to run:
    mkdir -p $HOME/extra_storage
    Now lets find the UUID of our drive(s):
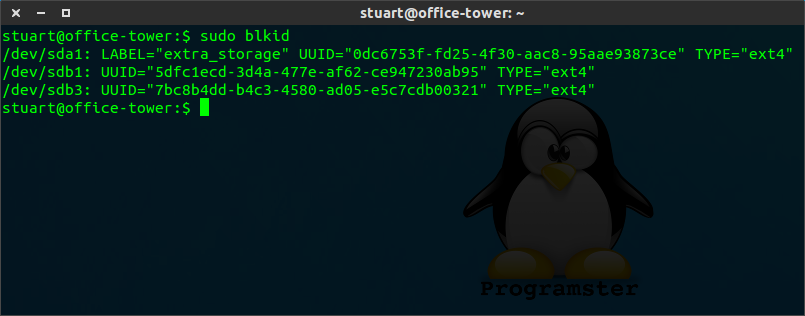
    sudo blkid


    [example of blkid output]

    As you can see, my drives/partitions are listed. Usually, your drives will have a LABEL which is useful for figuring out which UUID you want, so make sure you give your drives appropriate/unique labels when you format them!
    Now edit your fstab file:
    sudo $EDITOR /etc/fstab
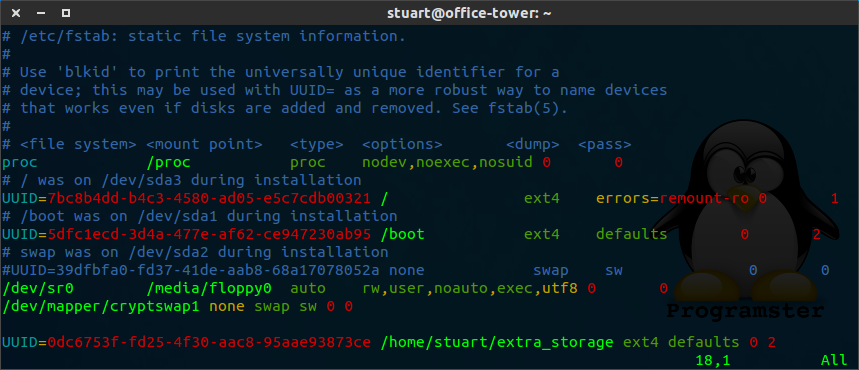
    Append the following line (1 for each drive)
    UUID=[UUID-GOES-HERE] [/path/to/mount] [FS type e.g. ext4 or ext3] defaults 0 2


    [my fstab file after addition of line]
    The last integer (in this case 2) represents the "pass num". This represents the order in which fsck checks the device/partition at boot time for errors. The options are 0/1/2 for dont check/check first/check last. Only the root partition should have a value of 1. It's up to you whether to set 0 or 2 for the other partitions, but it's probably a good idea to use 0 for NFS mounts!
    Now that should be done! If your drive has not already been mounted, then it should automatically be mounted with the following command:
    sudo mount -a
    Or you can test by rebooting!

References