Automatically mounting disk drives saves a lot of hassle, especially if you are using them for a home NFS storage system. This tutorial will show you how to set up Ubuntu to automatically mount the drives by UUID so that if you were to swap the sata cables or the drives around, it wouldn't matter, the correct drive will get mounted to the correct folder.
The first thing you need to do is create an empty directory where you want the drive to appear. E.g. I want my drive to be accessed from a directory called extra_storage in my home folder, so I am going to run:
mkdir -p $HOME/extra_storage
Now lets find the UUID of our drive(s):
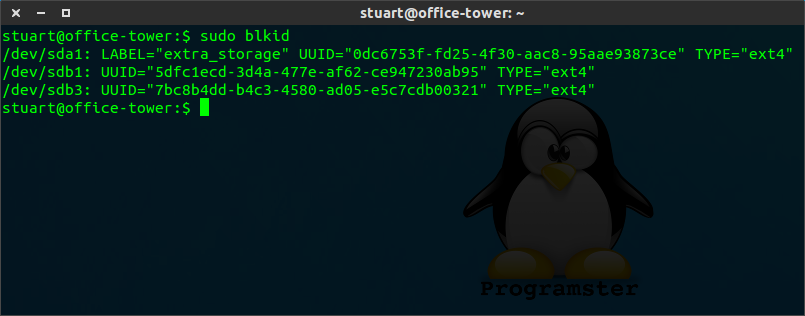
[example of blkid output]
As you can see, my drives/partitions are listed. Usually, your drives will have a LABEL which is useful for figuring out which UUID you want, so make sure you give your drives appropriate/unique labels when you format them!
sudo blkid
[example of blkid output]
As you can see, my drives/partitions are listed. Usually, your drives will have a LABEL which is useful for figuring out which UUID you want, so make sure you give your drives appropriate/unique labels when you format them!
Now edit your fstab file:
sudo $EDITOR /etc/fstab
Append the following line (1 for each drive)
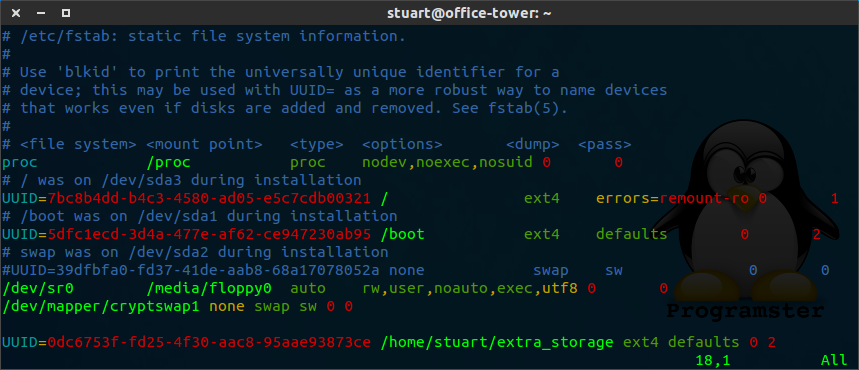
[my fstab file after addition of line]
UUID=[UUID-GOES-HERE] [/path/to/mount] [FS type e.g. ext4 or ext3] defaults 0 2
[my fstab file after addition of line]
The last integer (in this case 2) represents the "pass num". This represents the order in which fsck checks the device/partition at boot time for errors. The options are 0/1/2 for dont check/check first/check last. Only the root partition should have a value of 1. It's up to you whether to set 0 or 2 for the other partitions, but it's probably a good idea to use 0 for NFS mounts!
Now that should be done! If your drive has not already been mounted, then it should automatically be mounted with the following command:
sudo mount -a
Or you can test by rebooting!
No comments:
Post a Comment