Showing posts with label disk. Show all posts

Ubuntu 14.04 - TRIM Your SSD

Whilst watching htop when installing wine, I noticed a lot of disk wait time, which I thought was odd because I'm running a Samsung 830 SSD on Ubuntu 14.04. (If you're thinking about getting an SSD, I currently recommend the 840 EVO.) One of the "big features" of Ubuntu 14.04 was supposedly TRIM support, enabled by default, which should keep the SSD In fairly prime condition. It turns out that this is only "half the story".


Samsung And Intel Only

"Only Intel and Samsung SSDs will have TRIM enabled by default in Ubuntu 14.04 because some cheap SSDs can even brick themselves when running TRIM. This doesn't mean TRIM should only be used with Samsung and Intel SSDs, but to avoid running into issues, this is the only option for now." [ Source ]

Default Weekly Anacron TRIM

There is a script at

/etc/cron.weekly/fstrim
which executes the TRIM weekly with Anacron.

For those not familiar with Anacron, it's very much like the cron service, a utility that runs a task/script at a scheduled time or event (such as a reboot), except that with anacron, if the event was missed due to the computer being off at the time, anacron will trigger the script/task next time the computer is started up. The folders located at

/etc/cron.hourly/
,
/etc/cron.daily/, /etc/cron.weekly/
, and
/etc/cron.monthly/
Are folders that accept scripts which will be executed by the anacron service as root at the relevant time schedule (hourly, daily, weekly, monthly).

Using Anacron can be dangerous because if you miss the scheduled event several times (e.g. you just came back from a long holiday), it will cause the script/task to be triggered multiple times upon the next reboot (once for each missed scheduled occurance), so the script should handle this gracefully!

Manually Running TRIM

I wasn't prepared to wait until the weekly trigger for my SSD to be trimmed, and wanted to be sure that the SSD is getting trimmed, so I manually ran the TRIM with the following command:

sudo fstrim -v /

References

Benchmarking Disk Throughput With Samsung 840 120GB

So today I decided to see what speed I could get on my Samsung 840 (not to be confused with the 840 Pro, nor the 840 Evo). I performed a simple test to write 100MB and 1GB, each with a block size of 1MB for performance to the disk. Please note that I made sure to perform the tests outside of my home directory which is encrypted (and probably shouldn't be on 12.04 with an SSD). The results are below:

# Script that was used
rm 100MB.img
rm 1GB.img

echo "writing 1 GB of 0's to non home directory file"
dd if=/dev/zero of=100MB.img bs=1M count=100

# Just in case
sleep 10

echo "writing 1 GB of 0's to non home directory file"
dd if=/dev/zero of=1GB.img bs=1M count=1000

Obviously something fishy is going on here. Getting 2.5 GB/s throughput would be mind-blowing performance for a single consumer level SSD drive. Digging further, I found out that this is because the system will use the system's RAM (technically called DRAM) as a cache and return immediately, even before the data has actually been physically written to the drive. This is why it's always nice to have lots of free unused memory in a Linux machine, something you are unlikely to find on a VPS host.

Take RAM Out Of The Equation

We want to test how good our drive is, not how good the system is, so we need to ensure we know how long it took to actually write to the disk. Luckily, the dd command has options/flags for this.

  • conv=fdatasync - Ensure all data is written to the drive before finishing.
    This does not include metadata, to include that as well, you need to use fsync instead
  • oflag=dsync - This performs a sequential write of the data, ensuring that each individual write is written to the drive before moving onto the next one.
    To ensure both data and metadata is written, use sync instead.

No Cache Results

# Updated script
echo "writing 1GB of 0's (no cache)"
dd if=/dev/zero of=1GB.img bs=1M count=1000 conv=fdatasync

rm 1GB.img
sleep 3

echo ""
echo "writing 1GB sequentially"
dd if=/dev/zero of=1GB.img bs=1M count=1000 oflag=dsync

rm 1GB.img

Poorer Performance Than Expected

Well that was a massive blow to my ego. Thank goodness for caching, although that can lead to data loss/corruption if your power suddenly cuts out so invest in a UPS!

Get the Evo Version!

It's worth noting that the Amazon UK product page for the Samsung 840 Evo states that the drive has a sequential write speed of 410MB/s!

This is made possible by a little bit of extra hardware in the SSD that acts as an on-board cache. So that "sequential write" is sequential in the sense that it is going to the drive, but not in the sense of it actually having been written. This feels like a massive "cheat" and has shifted the buffer from your DRAM cache to your disks cache, but it will increase your sequential write benchmarks and be better for VPS hosts where RAM is heavily utilized or even oversold. The size of this buffer varies depending upon the capacity of drive, with 3GB, 3GB, 6GB, 9GB and 12GB for the 120GB, 250GB, 500GB, 750GB, and 1TB drives respectively. [ source ]

With regards to "RAPID Mode", this is a feature in Samsung's "Magician" software for Windows users that basically implements the DRAM buffer that Linux already has and was described earlier.

Last Note On Performance

These tests were performed on Ubuntu 12.04 which does not have TRIM support enabled by default, nor has it manually been activated. Having secure-erased the drive just beforehand or having had TRIM support enabled may have resulted in an increase in performance. However, I last secure-erased the drive 3 weeks ago and it is at 74% capacity, as well as being over-provisioned by 25%, so I'm pretty sure that it's still in a peak performance state. This is all to do with whether the SSD's controller needs to spend time erasing blocks before it can write new ones.

References

Ubuntu - Find Out Your Block Size

The block size you have on your drives can significantly affect performance, but can also cause a lot of wasted space if you set it too large. In simple terms, the block size represents the minimum amount of physical disk space that is taken up by a file. Hence, if you have lots of tiny text files, then it's a good idea to have a small block size in order to reduce wasted space. However, if you are using HDDs (traditional hard drives) to just store large media files such as movies and music, then you may find that you want to set a larger block size of perhaps 1 MiB for better read/write performance.

Why would Increasing The Block Size Increase Performance?

Each block needs to have some assosciated metadata. Thus if you have a smaller block size, then there is more metadata that has to be written when you write the entire file (e.g. file transfers). I assume this is particularly relevant to filesystem level encryption (e.g. truecrypt) where a tiny change to a file within the volume results in all the bits of the volume (thus all the blocks) changing and having to be updated. This is why serverbear benchmarks drives with block sizes at 1M and 64k as shown below:

What's the Command to Find Out My Block Size?

sudo dumpe2fs /dev/sda1 | fgrep -e 'Block size'
Make sure to swap "/dev/sda1" with whatever partition you want to check. It may be useful to run sudo blkid to get potential list. E.g. I had to use "/dev/mapper/vg_main-lv_main" to get the blocksize of my logical volume that combines my 3TB drives.

References

Creating Virtual Block Devices

When playing with filesystems or setting up virtual machines, you may want to create virtual block devices (files that act similar to hard drives). Here I will explain the two ways to create such devices and the pros/cons of each

Normal Way

This is the normal way to create a block device and will create an 8 GiB pre-allocated device:
dd if=/dev/zero of=/path/to/dir/filename.img bs=1M count=8192
You may want to change the block size (bs), and change the count in order to change the capacity of the device.
The count x bs = capacity, so reducing the block size would reduce your capacity if you did not adjust the count accordingly.

Advantages

  • Better performance than with the "sparse" method
  • Can't run out of space before the underlying device is full (dedicated).

Disadvantages

  • This eats up your disk capacity very quickly. E.g. your disk is "full" after creating lots of these empty devices, and the majority of them may never reach half capacity.
  • Slow to create (has to write the capacity's worth in 0's to the physical drive)

Sparse Image

Create a "sparse" image with the following example command which creates a 100GB device
dd if=/dev/zero of=/path/to/dir/filename.img bs=1k count=1 seek=100M
The 100M is NOT meant to be 100GB
Running an ls -alh will clearly show the file as being 100G in size, but running a df -h on / shows that it is not used.

Advantages

  • Almost instantaneous creation
  • Only data written to the image actually takes up space on your physical drive. Thus, you can oversell your physical drive.

Disadvantages

  • Poorer performance when writing to.
  • May not be able to write to the device before it's capacity is reached because the underlying device has been filled.

LVM - Merging Physical Drives

Logical Volume Management (LVM) is a nifty tool with many benefits. For me, there are two main benefits to using LVM.

  • Merging physical disks to appear as one volume when your drives aren't big enough.
  • Creating snapshots.

This tutorial aims to show you how to use LVM to quickly take advantage of the first benefit, pooling your drives together. Note that you can 'merge' volumes with RAID, but LVM is "easier" because you can mix and match different any size drives together and fully utilize them. With RAID, it is generally best match identical drive sizes together, but preferably with different amounts of usage/wear (i.e. Don't just stick two brand new drives into a raid array or they may fail at exactly the same time which defeats the purpose).

Note: This tutorial is written for guiding users through setting up thier first volume group and then to be re-used to add more drives to that volume group later. Thus, some of the steps may be need to be skipped depending on the scenario, and will clearly indicate to do so in the instructions, so please not just read the commands/code.

Steps

    For disks over 2TB we need to corrupt the GPT partition table.
    sudo dd if=/dev/zero of=/dev/sd[x] bs=512 count=1
    sudo partprobe
    Now we can create our physical volume on the drive with the following command:
    sudo pvcreate /dev/sd[x]
    If you are going to create a new volume group rather than add this to an existing one, perform the following command, otherwise please skip this step.
    sudo vgcreate [volume Group Name] /dev/sd[x]
    Example
    sudo vgcreate vgBackup /dev/sdc
    For all the other drives, or if you are adding this drive to an existing volume group:
    sudo vgextend [volume group name] /dev/sd[x]
    Example
    sudo vgextend vgBackup /dev/sdc
    If you are creating the LVM for the first time rather than extending an existing one:
    sudo lvcreate -L [size in GB]G -n lvBackup vgBackup
    Example:
    sudo lvcreate -L 3125G -n lvBackup vgBackup

    If you are adding a drive, or got the size slightly too low in the previous step, keep running the following command until you get an error message like
    "Insufficient free space: ___ extents needed, but only ___ available"

    sudo lvextend -L+[Number of GB to add]G -n /dev/[volume group name]/[logicial volume name]
    Example:
    sudo lvextend -L+1G -n /dev/vgBackup/lvBackup
    If you are creating a volume group rather than extending one then you will need to create a filesystem like so:
    sudo mkfs -t ext3 /dev/[volume group]/[volume name]
    Example:
    sudo mkfs -t ext3 /dev/vgBackup/lvBackup
    If you already have a filesystem on an existing volume group that you are adding to, then you need to extend that filesystem to utilize your newly added drive:
    resize2fs /dev/[volume group name]/[logical volume name]
    Example:
    resize2fs /dev/vgBackup/lvBackup
    Now lets mount your drive somewhere so you can store files on it. Make a directory somewhere (such as in your home folder or /mnt). Now mount the volume group manually:
    sudo mount /dev/[volume group name]/[logical volumen name] /path/to/new/directory
    Example
    sudo mkdir /mnt/backup
    sudo mount /dev/vgBackup/lvBackup /mnt/backup

References

Ubuntu - Using Fstab to Automatically Mount Drives

Automatically mounting disk drives saves a lot of hassle, especially if you are using them for a home NFS storage system. This tutorial will show you how to set up Ubuntu to automatically mount the drives by UUID so that if you were to swap the sata cables or the drives around, it wouldn't matter, the correct drive will get mounted to the correct folder.

    The first thing you need to do is create an empty directory where you want the drive to appear. E.g. I want my drive to be accessed from a directory called extra_storage in my home folder, so I am going to run:
    mkdir -p $HOME/extra_storage
    Now lets find the UUID of our drive(s):
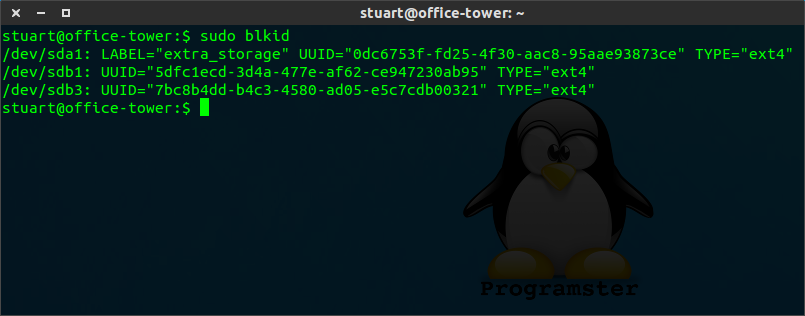
    sudo blkid


    [example of blkid output]

    As you can see, my drives/partitions are listed. Usually, your drives will have a LABEL which is useful for figuring out which UUID you want, so make sure you give your drives appropriate/unique labels when you format them!
    Now edit your fstab file:
    sudo $EDITOR /etc/fstab
    Append the following line (1 for each drive)
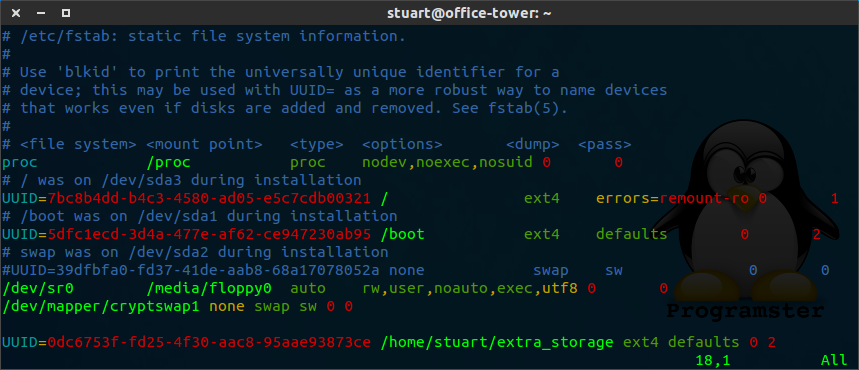
    UUID=[UUID-GOES-HERE] [/path/to/mount] [FS type e.g. ext4 or ext3] defaults 0 2


    [my fstab file after addition of line]
    The last integer (in this case 2) represents the "pass num". This represents the order in which fsck checks the device/partition at boot time for errors. The options are 0/1/2 for dont check/check first/check last. Only the root partition should have a value of 1. It's up to you whether to set 0 or 2 for the other partitions, but it's probably a good idea to use 0 for NFS mounts!
    Now that should be done! If your drive has not already been mounted, then it should automatically be mounted with the following command:
    sudo mount -a
    Or you can test by rebooting!

References