Showing posts with label tutorial. Show all posts

Ubuntu - Linux Groups And Permissons

You may have noticed that all permissions for files/folders have three categories. "owner", "group", and "everyone". These correspond to the 3 digits that you set for permissions, such as "750", which will give the owner the ability to do anything, users in the group to be able to read and execute the file, but not change it, and everyone else wont be able to do anything. Groups are a nice way of allowing certain users to be able to have limited access to your files, without giving everyone that same access. This is particularly relevant in the world of shared hosting. You need the apache process (which runs as www-data) to be able to access your files, but dont want to give this access to anyone else.

Add A User To A Group

sudo usermod -a -G [group] [user] 

# alternative method
sudo adduser [user] [group]

For example, you usually want to allow www-data to access your files so add them to your group (not the other way around). If you were to add users to the www-data group, then all those users have the group access to each others files!

sudo usermod -a -G [my-user] www-data

Incidentally, the permission level you probably want to set for your files on a webserver is 640 (750 for directories that need execute), which gives the owner read/write access, the group only read, and everyone else no access. The default permission level when creating files on ubuntu is 664, which gives everyone the ability to read your files!). If your lazy (like me), you can use the following command (but don't use if you don't want to give execute access, especially if you have an upload directory)

chmod 750 -R /path/to/web/directory

Permission Lookup Table

7 = rwx, - full access
6 = rw - read/write
5 = rx - read/execute
3 = r - read
2 = w - write
1 = x - execute
0 = --- no access

Remove Public (Other) Permissions

The following snippet configures all files within the specified directory (and the directory itself) such that users who are not part of the group or the owner have absolutely no permission to do anything.

chmod -R o-rwx [directory here]

Remove user from Group

sudo deluser [user] [group]
Forgetting to specify the group will delete the user instead!

Ubuntu 12.04 - Set Up an OpenVPN Server

Introduction

This tutorial will show you how to set up an OpenVPN server on Ubuntu Server 12.04 LTS.

Alternatively, I have an installation script so that you don't have to manually go through these steps. However, you will still need to copy the files to your local machine and start your OpenVPN client.

Related Posts

Steps

    Make sure your OS is up-to-date
    sudo apt-get update && sudo apt-get dist-upgrade -y
    sudo apt-get install openvpn openssl udev
    cp -R /usr/share/doc/openvpn/examples/easy-rsa/ /etc/openvpn
    cd /etc/openvpn/easy-rsa/2.0/
    If you were to follow other tutorials and just source the vars at this point you would get the following error:
    **************************************************************
    No /etc/openvpn/easy-rsa/2.0/openssl.cnf file could be found
    Further invocations will fail
    **************************************************************
    To fix this we need to edit the whichopensslcnf inside /etc/openvpn/easy-rsa/2.0
    vi /etc/openvpn/easy-rsa/2.0/whichopensslcnf
    And change
    else
    cnf="$1/openssl.cnf"
    fi
    to:
    else
    cnf="$1/openssl-1.0.0.cnf"
    fi
    . /etc/openvpn/easy-rsa/2.0/vars
    . /etc/openvpn/easy-rsa/2.0/clean-all
    . /etc/openvpn/easy-rsa/2.0/build-ca
    Next we need to create Server Key using the Certificate Authority we built in the previou step. Use the following command and just keep hitting Enter button at prompts unless you want to change the defaults (you might want to change the email) :
    ./build-key-server server
    We then need to do the same for the client key.
    ./build-key client1
    If you get an error after running the previous command, it is probably because you entered the exact same details as you did with the server for every field. One of the fields needs to be different.
    We need to generate Deffie Hellman Parameters which will be governing the key exchanges between the client and the server of Ubuntu OpenVPN. This is done with the following command:
    ./build-dh
    We need to move the keys we just generated to the directory that actually runs the openvpn service (/etc/openvpn).
    cd /etc/openvpn/easy-rsa/2.0/keys
    cp ca.crt ca.key client1.key client1.crt dh1024.pem server.crt server.key /etc/openvpn
    Copy the sample server configuration file to the directory that will run it. We will edit it later.
    cd /usr/share/doc/openvpn/examples/sample-config-files
    uncompress server.conf.gz
    cp server.conf /etc/openvpn/
    Copy the sample client configuration as we did with the server. We will edit it later.
    cp client.conf /etc/openvpn/
    cd /etc/openvpn/
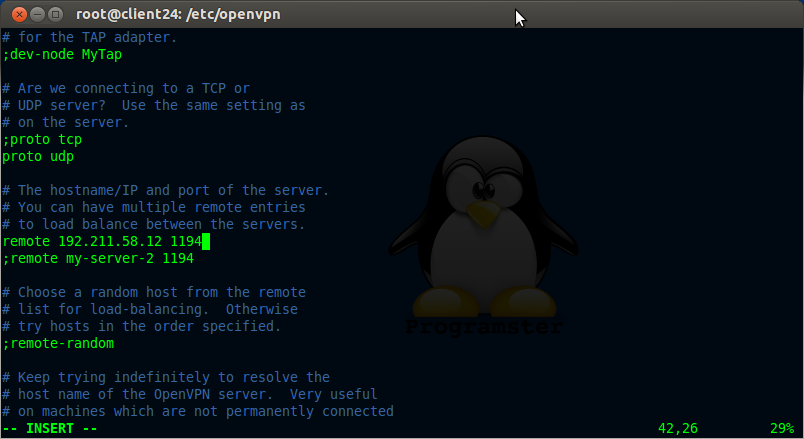
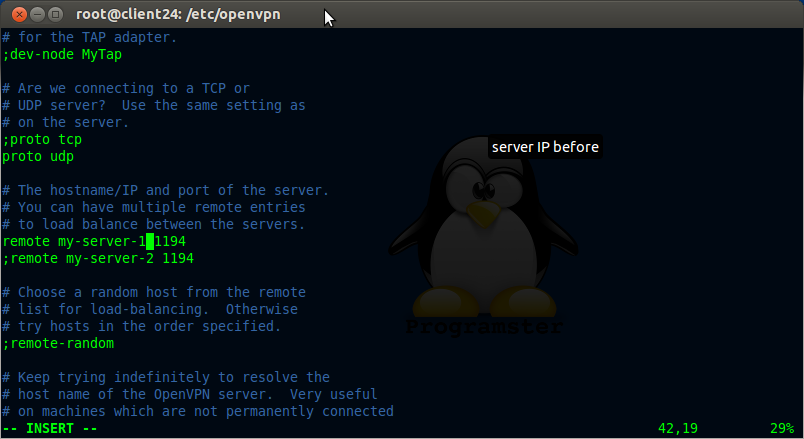
    Change the address of the server from my-server-1 to whatever the server's ip is as seen below:
    vi client.conf

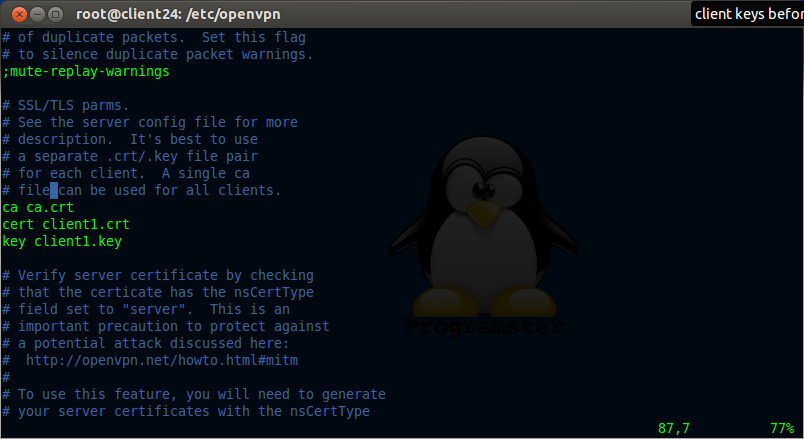
    Now update text 'client' to 'client1' as shown below:
    Now update the server's details
    vi /etc/openvpn/server.conf
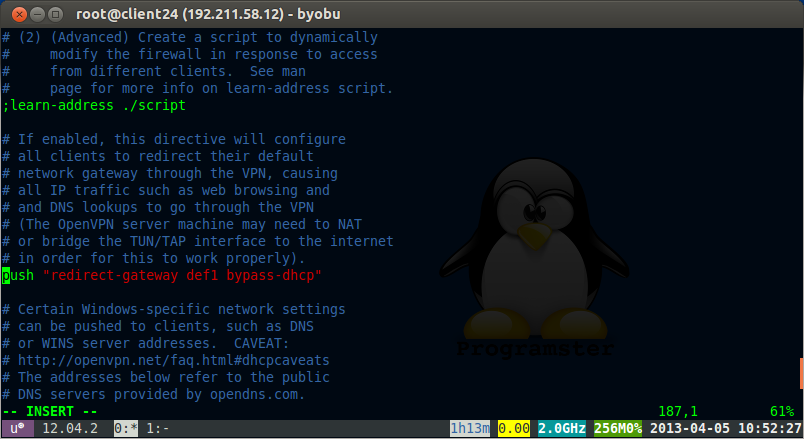
    Uncomment the following line:
    push "redirect-gateway def1 bypass-dhcp"

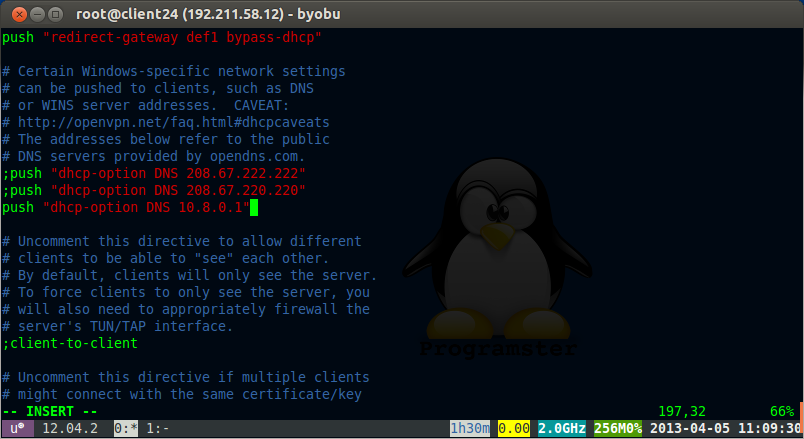
    Add this line as the only push for dhcp-option (comment out others):
    push "dhcp-option DNS 10.8.0.1"
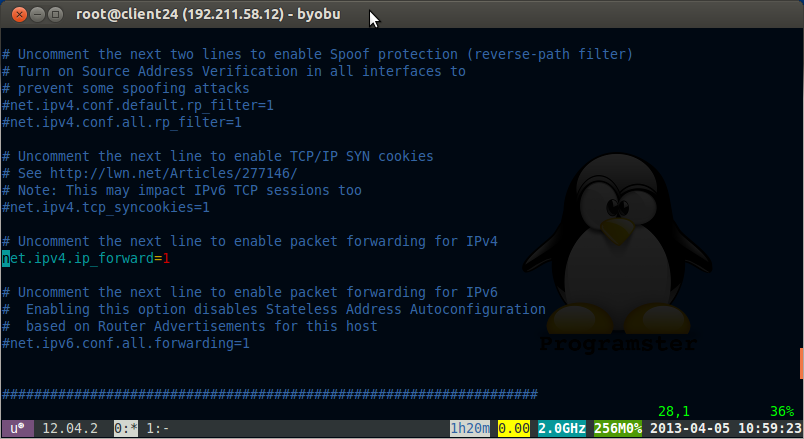
    vi /etc/sysctl.conf
    uncomment the following line
    net.ipv4.ip_forward=1
    We also need to run the following command for packet forwarding to work
    echo 1 > /proc/sys/net/ipv4/ip_forward
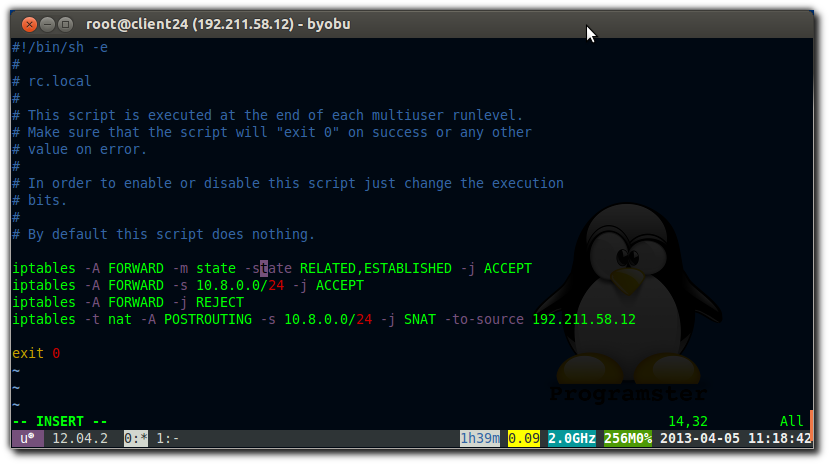
    Set up firewall to forward packets for vpn. Dont forget to replace the 'YOUR_SERVERS_IP_HERE' text.
    vi /etc/rc.local
    iptables -A FORWARD -m state --state RELATED,ESTABLISHED -j ACCEPT
    iptables -A FORWARD -s 10.8.0.0/24 -j ACCEPT
    iptables -A FORWARD -j REJECT
    iptables -t nat -A POSTROUTING -s 10.8.0.0/24 -j SNAT --to-source YOUR_SERVERS_IP_HERE

    Alternatively, as lustrul pointed out in the comments, you may use MASQUERADE instead (which will automatically use the correct IP for that NIC):

    iptables -A FORWARD -m state --state RELATED,ESTABLISHED -j ACCEPT
    iptables -A FORWARD -s 10.8.0.0/24 -j ACCEPT
    iptables -A FORWARD -j REJECT
    iptables -t nat -A POSTROUTING -s 10.8.0.0/24 -o eth0 -j MASQUERADE
    If managing firewall with ufw you will need to run these commands:
    ufw allow 1194/udp
    ufw allow 1194/tcp
    /etc/init.d/openvpn restart
    If at this point you get an error like shown below then it means that you are probably on an OpenVZ client vps and that your host has not yet set up the tun/tap for you:

    The solution is to follow the instructions on the host (if you have acccess).
    lsmod | grep tun
    If nothing appears then run this:
    modprobe tun
    lsmod | grep tun

    Then allow the container access to the tun (again from inside the host):
    CTID=YOUR_CONTAINERS_ID_HERE
    vzctl set $CTID --devnodes net/tun:rw --save
    vzctl set $CTID --devices c:10:200:rw --save
    vzctl set $CTID --capability net_admin:on --save
    vzctl exec $CTID mkdir -p /dev/net
    vzctl exec $CTID mknod /dev/net/tun c 10 200
    vzctl exec $CTID chmod 600 /dev/net/tun
    copy ca.crt client.conf client1.crt and client1.key to your client computer.
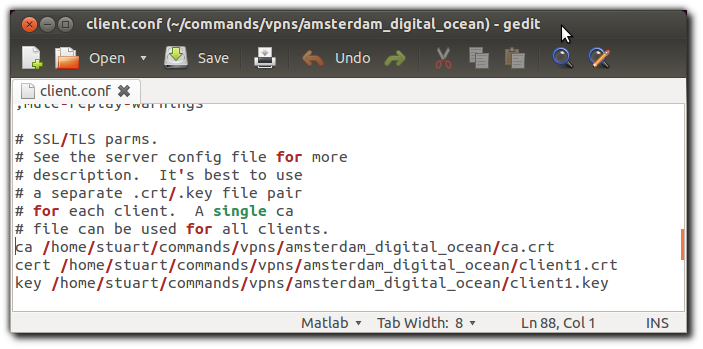
    Edit the "ca", "cert", and "key" paths in the client.conf to be the full path to where you just copied the files as shown below (e.g. don't just copy the text below):
    Remove client.conf from /etc/openvpn on the server now that you have copied it, and restart the openvpn service.
    rm /etc/openvpn/client.conf
    service openvpn restart
    Run this command on your client computer:
    sudo openvpn --config /location/of/your/copied/files/client.conf

Source / References


An Update From The Community

If your running a windows client, try setting the encryption algorithm to BF-CBC 128 bit as this offers better compatibility. Another guide has been written, which uses Webmin + OpenVPN Module instead, in order to easily setup and manage your OpenVPN server.

Getting Started With Cuda (With MSVC++ 2008)


I spent an age trying to set up with CUDA. When I finally figured out how, I decided that I never wanted to have to go through that again and wanted to write a tutorial for me and others just in case I need to do it again in the future.

What you need:
  1. MSVC++ 2008 Express (32 bit).
  2. Windows 32 bit Nvidia toolkit.
  3. Windows 32bit Nvidia SDK.


You cannot get this done in 64bit express for various reasons but can in the paid for 64 bit version. I do not cover 64bit, I just hope that its the same which it probably isnt.

If your not running windows, or are wanting 64 bit nvidia toolkit get it from the relative section from this site.

Again if your wanting the 64bit Nvidia SDK then click the necessary option from the bottom of the largest post on this page (you'll know when you see it):


Lastly follow these steps to set up MSVC++ 2008. These steps were taken from here. (looks harder than it is).


Step 1: Adding cuda.rules to your project

Right click on your project –> Custom Build Rules
image

Click on New Rule File and browse to your %CUDA Folder%cuda_build_rule/cuda.rules
image

Step 2: Now setup your BIN, INCLUDE and LIB directories.

Goto Tools –> Options –> Projects and Solutions –> VC++ Directories
image

First, lets specify the INCLUDE directories. Select Include Directories from the “Show Directories for” dropdown menu.

Create a new line by clicking the new file button and specify %CUDA Directory%include
image

Similarly, select Library files from the dropdown and specify: %CUDA%lib directory
image

Similarly, select Executable files from the dropdown and specify: %CUDA%bin directory
image

Final Step: Specify the CUDA Runtime and CUTIL32D Linkers

Linkers work during compilation when your code is linked to external libraries that you use.

Goto Project –> Properties –> Configuration Properties –> Linker –> Input and specify two few files in the Additional Dependencies field: CUDART.lib and CUTIL32D.lib
image

Now goto Project –> Properties –> Configuration Properties –> Linker –> General and paste this line in the Additional Library Directories field: $(CUDA_LIB_PATH);../../common/lib
image

Alas! You’re done! Now you can try Rebuilding the sample code that comes with CUDA SDK. Simply open the project folder and then open the .sln file in it to open it in VS08 and then Right click on the project and click Rebuild and run it for yourself!
image

If everything has been properly setup, The Rebuild should be Successful.


Common Mistakes to avoid - I think
Please note that when the site explaining how to set up the IDE is asking you to link the SDK library and include files etc, you should go here on your computer:
C:\ProgramData\NVIDIA Corporation\NVIDIA GPU Computing SDK\C

and ALSO here just to be safe:
C:\Program Files\NVIDIA GPU Computing Toolkit\CUDA.

I couldnt get it to work just linking one of either, I dont know what to mix and match so i just linked all lib / bin/ and inc folders from both areas and works.

(dont forget to browse into the necessary folders ie 'include' and 'ib', dont just copy and paste the text I put just there thats the start of the file path.)

Also note that any cuda programming you do should have the file extension '.cu' and not '.c' or '.cpp' just in case you didn't know. Seems like nobody ever mentions the more obvious stuff. Note that the single quote marks are not to be part of the file name.


Tutorial: High Speed Accurate Collision Detection

I just created a simple golf game using the techniques that I will describe in this tutorial. I had originally used simple axis aligned bounding boxes to my ground mesh to calculate and resolve collisions (Figure 1 below), but in this tutorial, I will show you a much more accurate way by taking it a step further, without costing lots of CPU or memory. A diagram showing in simple terms what I will be doing is shown here:

Click here to view full size

The example provided is using collision detection of a height-field terrain, against a ball, but you can use the theory for many aspects of collision detection. Also note that in my example x is the length of the field, y is the height of the field with y going up and direction of gravity, whilst z is the width of the terrain/pitch.

The problem with general axis aligned bounding boxes was that the golf ball would always rest on each polygon at the height of the maximum y value as shown in figure 1 (where y, not z was the direction of gravity in this case, x and z are the length and width of the field). What we really want (shown in Figure 2) is to have the golf ball rest on the polygon, AND check when it goes past or hits that part of the polygon, not just when its gone past the lowest or highest y value. This does not mean the bottom y of the ball touches the polygon or the bottom/max x, but the actual point of the ball that should be touching the polygon.

Figure 1
Click here to view full size

Figure 2
Click here to view full size

In my example, I use a 2x2 grid array of squares/quadrilaterals(actually 2x2x2 because had two triangles for each grid but you can think of it as 2x2 of squares) First we need to know what grid the ball is currently above or inside (where would the shadow fall if the sun directly above ball). To do this, we want to multiply the ball/object's coordinates, by the scalar size of your grid (IE how many units along x/z axis is each grid cell, note that this is not the size, as the y values should be variable). You then use this to select which polygon you know the ball is above and going to hit if it was to hit something in that timeslice/frame.

Once you have the polygon that is in question we need to find out if there is an intersection or hit. First, you need to find out its normal (shown in figure 3). This will be used towards creating a transformation matrix (I'll step you through it, don't let that put you off) which will transform the polygon so that it is facing directly upwards, and transform the ball so that it is still in the same position relative to the polygon. For those who dint know how, the normal can be determined by the cross product of two rays that form a triangle on the polygon (IE two sides of the polygon that meet at a corner such as Vector 1 and Vector 2 in Figure 3). This is best with triangles as they have to form a flat plane, whereas quadrilaterals may or may not form a flat face (not all points lie on a plane). Once you have the normal, you need to calculate the cross product of one of the sides with the normal. This will give you completely orthogonal axis that will form our new X,Y, and Z coordinate system, as shown as the resultant Vector in figure 3. I call them x', y', and z' respectively (the dash, not the capitalization). You can think of this as setting up a local coordinate system, rather than a world coordinate system.

Figure 3
Click here to view full size

For the next bit it is probably easist if you create some sort of matrix class. I created one with 3 vectors called xcomponent; ycomponent; zcomponent; and my constructor for the class takes three vectors, Vector3F x, Vector3F y, Vector3F z, which are assigned to the three componenets. Now just simply plug in the ray that is part of the polygon as the x or z vectors that form the matrix, whilst using the normal that was found earlier as the y component. The missing component (x or z) should be assigned the axis determined by the cross product of the side of the polygon with the normal for a complete orhthogonal set. Note that you could just use two sides of the polygon that meet at a corner, but this would probably distort the ball/polygon so they are no longer the same shape in a sense (if you were to draw them using the new coordinates), which could result in incorrect collision detection if you didnt take this into account.

Once you have those three components for the matrix, you then just need to multiply the vertices of the polygon and the ball position by this matrix to get the new coordinates of the polygon vertices and the ball. I perform my multiplication like this:

Vector3F result;
result.x = vec.x * xcomponent.x + vec.y * xcomponent.y + vec.z * xcomponent.z;
result.y = vec.x * ycomponent.x + vec.y * ycomponent.y + vec.z * ycomponent.z;
result.z = vec.x * zcomponent.x + vec.y * zcomponent.y + vec.z * zcomponent.z;
return result;

where result is the new coordinates of a vertex, and vec is the coordinate of the vertex put into the transformation.

Basically what we have done is now set the polygon to be flat to an axis plane, and set the ball to the correct position relative to the polygon. Now you can simply test if the ball's y position value minus its radius is less than or equal to the y value of any of the vertices on the polygon. If there is then you have detected a collision! If not then there is no collision.

To resolve the collision, I recommend simply putting the ball's position equal to the polygon's y value plus the ball's radius. Then to get back to the regular world coordinates you simply take the trasformation matrix from earlier and invert it. You then multiply the new coordinates you created for the ball and multiply them by that inverted matrix.

Inverting a matrix is really boring/tedious so ill just give you the code. I've tested it, it works. The code is based on http://www.dr-lex.be/random/matrix_inv.html where I took the maths and adapted it to my situation. I kept all his variable names for simplicity.

float a11 = this->xcomponent.x;
float a12 = this->xcomponent.y;
float a13 = this->xcomponent.z;

float a21 = this->ycomponent.x;
float a22 = this->ycomponent.y;
float a23 = this->ycomponent.z;

float a31 = this->zcomponent.x;
float a32 = this->zcomponent.y;
float a33 = this->zcomponent.z;

float determinant = a11 * (a33 * a22 - a32 * a23) - a21 * (a33 * a12 - a32 * a13) + a31 * (a23 * a12 - a22 * a13);

xcomponent.x = a33 * a22 - a32 * a23;
xcomponent.y = -(a33 * a12 - a32 * a13);
xcomponent.z = a23 * a12 - a22 * a13;

ycomponent.x = -(a33 * a21 - a31 * a23);
ycomponent.y = a33 * a11 - a31 * a13;
ycomponent.z = -(a23 * a11 - a21 * a13);

zcomponent.x = a32 * a21 - a31 * a22;
zcomponent.y = -(a32 * a11 - a31 * a12);
zcomponent.z = a22 * a11 - a21 * a12;

//multiply by 1 over determinant
determinant = 1.0 / determinant;

xcomponent.x *= determinant;
xcomponent.y *= determinant;
xcomponent.z *= determinant;

ycomponent.x *= determinant;
ycomponent.y *= determinant;
ycomponent.z *= determinant;

zcomponent.x *= determinant;
zcomponent.y *= determinant;
zcomponent.z *= determinant;

Now that you have the inverted matrix. Multiply the ball coordinates by that to get the correct coordinates for the world. From this point you now have a ball resting on the plane of the polygon. I took this a step further and calculated the angle of reflection at this point by taking the balls current velocity and the normal of the polygons face (original normal in world coordinates, not the normal when the polygon was converted to be aligned to the axis. That would give a straight up normal which would be incorrect unless you performed this step before converting back to world coordinates.) Here is a function that will do this for you.

static Vector3F calculateReflectionVector(Vector3F incidence, Vector3F normal)
{
float value = dotProduct(normal, incidence);
value *= 2;
Vector3F newVector = normal;
newVector.multiplyByScalar(value);
Vector3F reflection = incidence - newVector;
return reflection;
}

You now just set the balls velocity to the reflection vector provided so that it will bounce off the polygon, not just stick to it like a magnet, unless you want it to act like a magnet of course...

Special Thanks To:


www.uploadscreenshot.com for making my life so much easier, allowing me to quickly and easily post pictures/diagrams up for my blogs. Much easier than using the in house image manager that blogger provides.

APPENDAGES


if you want to see the Vector3F class that i use in this tutorial its here:


#ifndef VECTOR3F_H
#define VECTOR3F_H

#include
#include

class Vector3F
{
public: //public attributes
float x, y, z;

public: //public methods
Vector3F(float, float, float);
//Vector3F(const Vector3F &vec);
Vector3F();


/*IMPORTANT - These operater overloader functions are copied from
* OpenGl Game Programming by Kevin Hawkins and Dave Astle, published 2001.
* but additional messages have been added by me, such as the mouswheel one and adjusted mouse movement.
*/
const Vector3F operator +(const Vector3F &vec) // addition
{
return Vector3F(x+vec.x, y+vec.y, z+vec.z);
}

const Vector3F operator -(const Vector3F &vec) //subtraction
{
return Vector3F(x-vec.x, y-vec.y, z-vec.z);
}
//end of copied functions


void setMagnitude(Vector3F);
void setMagnitude(float);
void multiplyByScalar(float);
void outputCoordinates(std::string);
void outputCoordinates();
float calculateMagnitude();


};

#endif


----------------------------------
And the CPP file of the Vector3F class


#include "Vector3F.h"
#include "VectorMaths.h"
#include
#include
#include
#include

Vector3F::Vector3F(float xx, float yy, float zz)
{
Vector3F::x = xx;
Vector3F::y = yy;
Vector3F::z = zz;
}


Vector3F::Vector3F()
{
Vector3F::x = 0;
Vector3F::y = 1; //just to give it a magnitude.
Vector3F::z = 0;
}

float Vector3F::calculateMagnitude()
{
float mag = sqrt( pow(this->x,2) + pow(this->y,2) + pow(this->z,2) );
if(mag == 0)
{
mag = 0; //--------------------------------------this shouldnt happen.
}
return mag;
}

void Vector3F::setMagnitude(Vector3F magnitudeVector)
{
Vector3F::setMagnitude(magnitudeVector.calculateMagnitude());
}

void Vector3F::setMagnitude(float magnitudeAmount)
{
float xx = this->x;
float yy = this->x;
float zz = this->x;
if(magnitudeAmount > 1.0)
{
std::cout << "this is annoying" << std::endl;
}
float magnitude = this->calculateMagnitude();

if(magnitude == 0)
{
std::cout << "SYSTEM ERROR ORIGINAL VECTOR MAGNITUDE IS 0 SO CANT SET AS A MAG" << std::endl;
//temp code
Vector3F::x = 0;
Vector3F::y = 1;
Vector3F::z = 0;
}


//convert to unit vector
Vector3F::x = Vector3F::x / magnitude;
Vector3F::y = Vector3F::y / magnitude;
Vector3F::z = Vector3F::z / magnitude;

//make it aas large as desired
float scalar = magnitudeAmount;
Vector3F::x = Vector3F::x * scalar;
Vector3F::y = Vector3F::y * scalar;
Vector3F::z = Vector3F::z * scalar;

float magnitude2 = Vector3F::calculateMagnitude();
float diff = magnitude2 - magnitudeAmount;
if(diff < -0.5 || diff > 0.5)
{
std::cout << "this is annoying" << std::endl;
}

}

void Vector3F::multiplyByScalar(float scalar)
{
Vector3F::x = Vector3F::x * scalar;
Vector3F::y = Vector3F::y * scalar;
Vector3F::z = Vector3F::z * scalar;
}

void Vector3F::outputCoordinates()
{
std::cout << Vector3F::x << " , " << Vector3F::y << " , " << Vector3F::z << std::endl;
}
void Vector3F::outputCoordinates(std::string s)
{
std::cout << "" << s << Vector3F::x << " , " << Vector3F::y << " , " << Vector3F::z << std::endl;
}