Introduction
This tutorial will show you how to set up an OpenVPN server on Ubuntu Server 12.04 LTS.
Alternatively, I have an installation script so that you don't have to manually go through these steps. However, you will still need to copy the files to your local machine and start your OpenVPN client.
Related Posts
- You could setup OpenVPN on CentOS 6.5 instead.
- Windows users may want to read this post about how to then connect to the server once they have transferred the configuration files from $HOMEto their local computer.
- How to connect to the VPN server on android devices when you have completed this tutorial
Steps
Make sure your OS is up-to-date
sudo apt-get update && sudo apt-get dist-upgrade -y
sudo apt-get install openvpn openssl udev
cp -R /usr/share/doc/openvpn/examples/easy-rsa/ /etc/openvpn
cd /etc/openvpn/easy-rsa/2.0/
If you were to follow other tutorials and just source the vars at this point you would get the following error:
**************************************************************
No /etc/openvpn/easy-rsa/2.0/openssl.cnf file could be found
Further invocations will fail
**************************************************************
To fix this we need to edit the whichopensslcnf inside /etc/openvpn/easy-rsa/2.0
No /etc/openvpn/easy-rsa/2.0/openssl.cnf file could be found
Further invocations will fail
**************************************************************
vi /etc/openvpn/easy-rsa/2.0/whichopensslcnf
And change
else
cnf="$1/openssl.cnf"
fi
to:
cnf="$1/openssl.cnf"
fi
else
cnf="$1/openssl-1.0.0.cnf"
fi
cnf="$1/openssl-1.0.0.cnf"
fi
. /etc/openvpn/easy-rsa/2.0/vars
. /etc/openvpn/easy-rsa/2.0/clean-all
. /etc/openvpn/easy-rsa/2.0/build-ca
. /etc/openvpn/easy-rsa/2.0/clean-all
. /etc/openvpn/easy-rsa/2.0/build-ca
Next we need to create Server Key using the Certificate Authority we built in the previou step. Use the following command and just keep hitting Enter button at prompts unless you want to change the defaults (you might want to change the email) :
./build-key-server server
We then need to do the same for the client key.
./build-key client1
If you get an error after running the previous command, it is probably because you entered the exact same details as you did with the server for every field. One of the fields needs to be different.
We need to generate Deffie Hellman Parameters which will be governing the key exchanges between the client and the server of Ubuntu OpenVPN. This is done with the following command:
./build-dh
We need to move the keys we just generated to the directory that actually runs the openvpn service (/etc/openvpn).
cd /etc/openvpn/easy-rsa/2.0/keys
cp ca.crt ca.key client1.key client1.crt dh1024.pem server.crt server.key /etc/openvpn
cp ca.crt ca.key client1.key client1.crt dh1024.pem server.crt server.key /etc/openvpn
Copy the sample server configuration file to the directory that will run it. We will edit it later.
cd /usr/share/doc/openvpn/examples/sample-config-files
uncompress server.conf.gz
cp server.conf /etc/openvpn/
uncompress server.conf.gz
cp server.conf /etc/openvpn/
Copy the sample client configuration as we did with the server. We will edit it later.
cp client.conf /etc/openvpn/
cd /etc/openvpn/
Change the address of the server from my-server-1 to whatever the server's ip is as seen below:
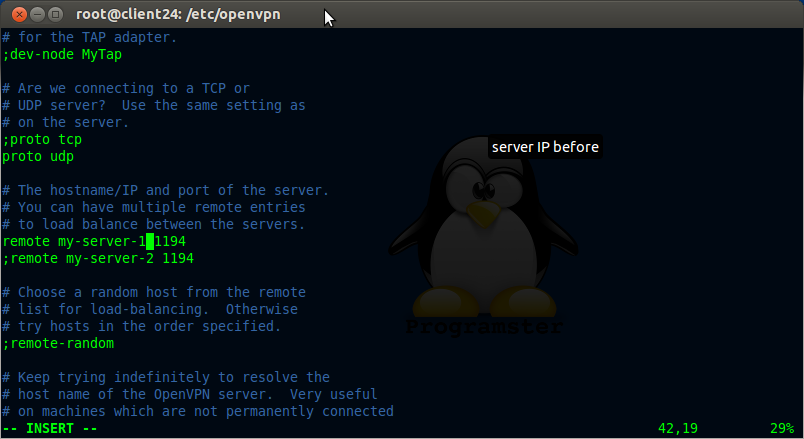

vi client.conf
Now update text 'client' to 'client1' as shown below:
Now update the server's details
Add this line as the only push for dhcp-option (comment out others):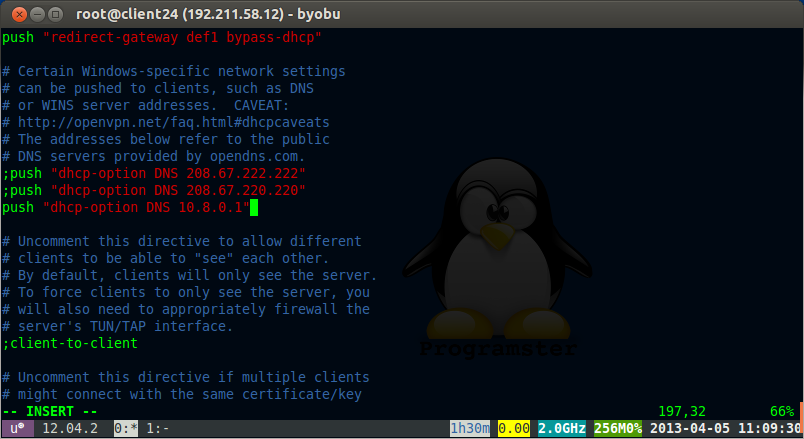
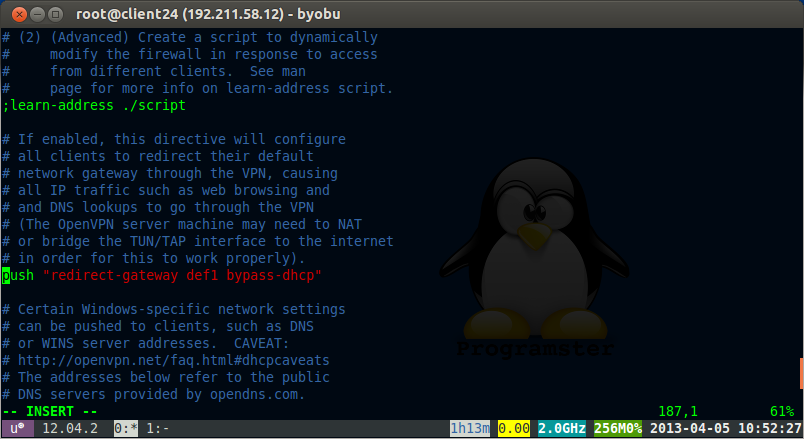
vi /etc/openvpn/server.conf
Uncomment the following line:
push "redirect-gateway def1 bypass-dhcp"
Add this line as the only push for dhcp-option (comment out others):
push "dhcp-option DNS 10.8.0.1"
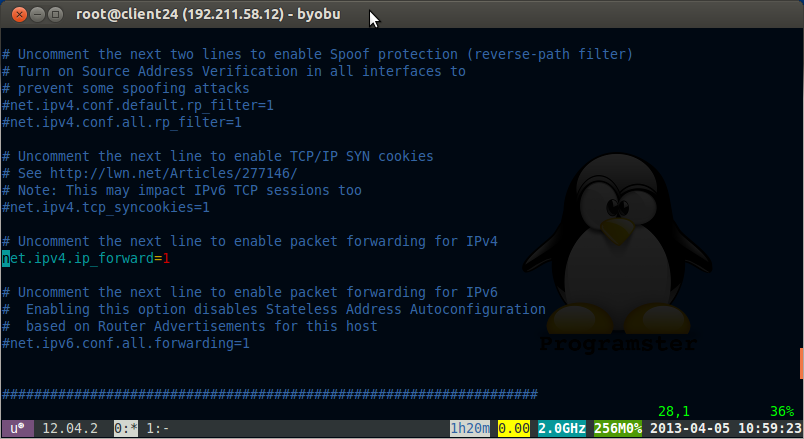
vi /etc/sysctl.conf
uncomment the following line
net.ipv4.ip_forward=1
We also need to run the following command for packet forwarding to work
echo 1 > /proc/sys/net/ipv4/ip_forward
Set up firewall to forward packets for vpn. Dont forget to replace the 'YOUR_SERVERS_IP_HERE' text.
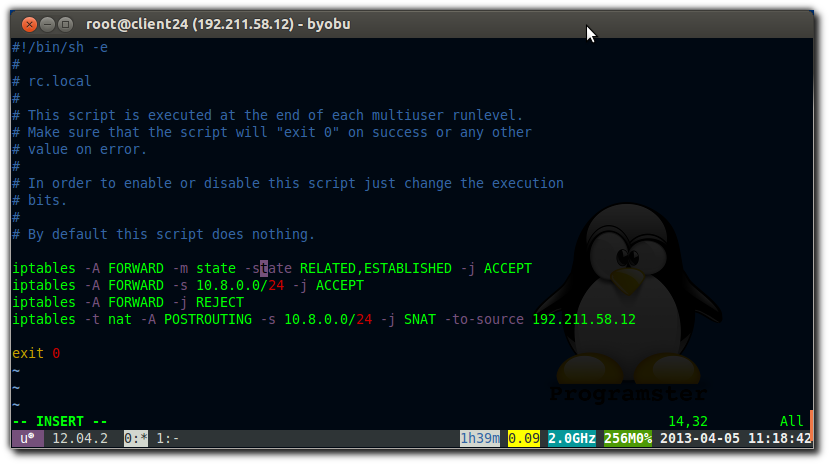
vi /etc/rc.local
iptables -A FORWARD -m state --state RELATED,ESTABLISHED -j ACCEPT
iptables -A FORWARD -s 10.8.0.0/24 -j ACCEPT
iptables -A FORWARD -j REJECT
iptables -t nat -A POSTROUTING -s 10.8.0.0/24 -j SNAT --to-source YOUR_SERVERS_IP_HERE
iptables -A FORWARD -s 10.8.0.0/24 -j ACCEPT
iptables -A FORWARD -j REJECT
iptables -t nat -A POSTROUTING -s 10.8.0.0/24 -j SNAT --to-source YOUR_SERVERS_IP_HERE
Alternatively, as lustrul pointed out in the comments, you may use MASQUERADE instead (which will automatically use the correct IP for that NIC):
iptables -A FORWARD -m state --state RELATED,ESTABLISHED -j ACCEPT
iptables -A FORWARD -s 10.8.0.0/24 -j ACCEPT
iptables -A FORWARD -j REJECT
iptables -t nat -A POSTROUTING -s 10.8.0.0/24 -o eth0 -j MASQUERADE
iptables -A FORWARD -s 10.8.0.0/24 -j ACCEPT
iptables -A FORWARD -j REJECT
iptables -t nat -A POSTROUTING -s 10.8.0.0/24 -o eth0 -j MASQUERADE
If managing firewall with ufw you will need to run these commands:
ufw allow 1194/udp
ufw allow 1194/tcp
ufw allow 1194/tcp
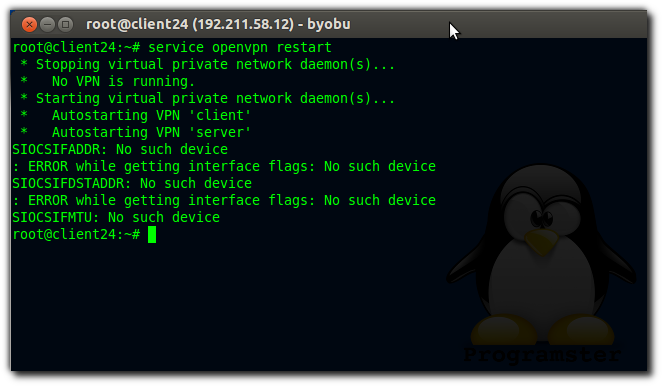
/etc/init.d/openvpn restart
If at this point you get an error like shown below then it means that you are probably on an OpenVZ client vps and that your host has not yet set up the tun/tap for you:
The solution is to follow the instructions on the host (if you have acccess).
Then allow the container access to the tun (again from inside the host):
The solution is to follow the instructions on the host (if you have acccess).
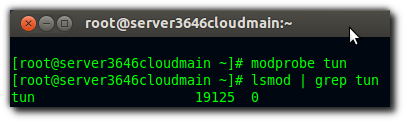
lsmod | grep tun
If nothing appears then run this:
modprobe tun
lsmod | grep tun
lsmod | grep tun
Then allow the container access to the tun (again from inside the host):
CTID=YOUR_CONTAINERS_ID_HERE
vzctl set $CTID --devnodes net/tun:rw --save
vzctl set $CTID --devices c:10:200:rw --save
vzctl set $CTID --capability net_admin:on --save
vzctl exec $CTID mkdir -p /dev/net
vzctl exec $CTID mknod /dev/net/tun c 10 200
vzctl exec $CTID chmod 600 /dev/net/tun
vzctl set $CTID --devnodes net/tun:rw --save
vzctl set $CTID --devices c:10:200:rw --save
vzctl set $CTID --capability net_admin:on --save
vzctl exec $CTID mkdir -p /dev/net
vzctl exec $CTID mknod /dev/net/tun c 10 200
vzctl exec $CTID chmod 600 /dev/net/tun
copy ca.crt client.conf client1.crt and client1.key to your client computer.
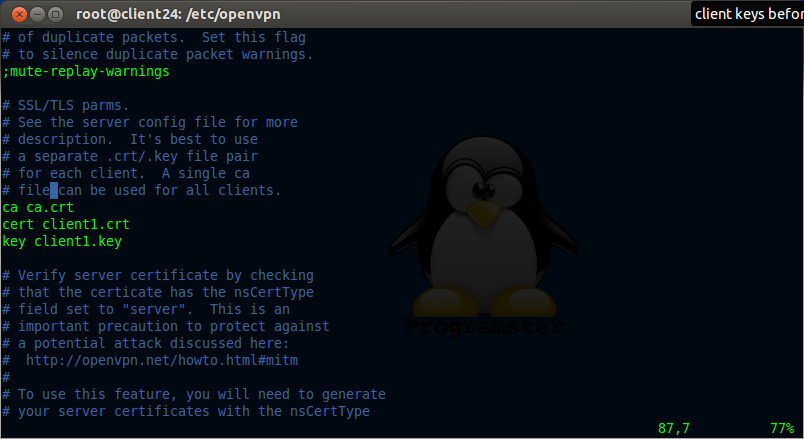
Edit the "ca", "cert", and "key" paths in the client.conf to be the full path to where you just copied the files as shown below (e.g. don't just copy the text below):
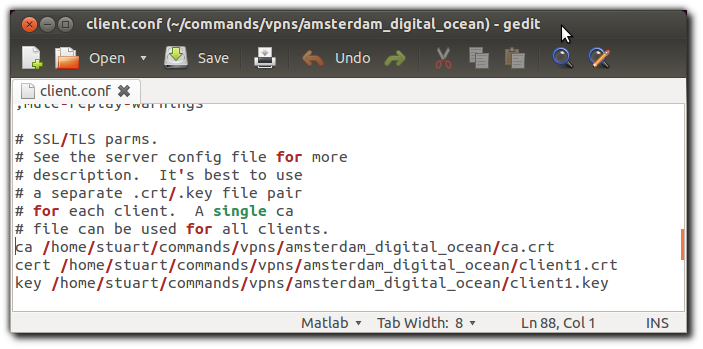
Remove client.conf from /etc/openvpn on the server now that you have copied it, and restart the openvpn service.
rm /etc/openvpn/client.conf
service openvpn restart
service openvpn restart
Run this command on your client computer:
sudo openvpn --config /location/of/your/copied/files/client.conf
Source / References
- TipUpdate How To Install OpenVPN on Ubuntu VPS
- Ask ubuntu - OpenVPN on Ubuntu OpenVZ
- Enabling iptables for a VPS
- Getting OpenVPN to work on an OpenVZ VPS
- How to Create a VPN Server on Ubuntu 12.04 (YouTube Video)
- Where I found how to fix OpenSSL error
An Update From The Community
If your running a windows client, try setting the encryption algorithm to BF-CBC 128 bit as this offers better compatibility. Another guide has been written, which uses Webmin + OpenVPN Module instead, in order to easily setup and manage your OpenVPN server.
I can connect to the openvpn server via my client machine but I can't the DNS to resolve url's e.g. google.com.
ReplyDeleteCheck that you can ping 8.8.8.8 but not www.google.com. If this is the case, then you need to manually set the dns on your client (not the openvpn server). I set mine to 8.8.8.8 or 8.8.4.4 (google).
DeleteFor those who still unsuccessful connecting to internet, you can try IP Masquerading:
Deletejust modify the last line at step 20 as:
iptables -t nat -A POSTROUTING -s 10.8.0.0/24 -o eth0 -j MASQUERADE
and try connecting again. For more information, consult this address: http://billauer.co.il/ipmasq-html.html
Thanks for the tip lustral, I seem to remember that there was a reason why I didn't use the MASQUERADE technique but can't remember why for now. All I could find is this: "... with SNAT, the kernel's connection tracking keeps track of all the connections when the interface is taken down and brought back up; the same is not true for the MASQUERADE target." [source] However this wont be an issue for 99.9% of users so I will add your tip to the tutorial. Thanks again!
Deletewhat is the magic of 10.8.0.1 ip address? Should I change it to something else?
ReplyDeleteI believe 10.8.0.1 just came directly from the tutorial(s) I read and I never bothered experimenting. Please let me know if you find any issues with changing it, and if not, then I will update this tutorial.
DeleteHi there, thanks for the nice tutorial! Could you tell me what terminal theme you use and how you get the little bar at the bottom, please? Thanks!
ReplyDeleteSure thing! I use the standard 'green on black' theme built into gnome-terminal, but then I set the background to use transparency instead of a solid colour. It looks blueish because my background is blue. The programster 'logo' you see is actually just from my wallpaper as well.
DeleteTo get the 'title bar' at the bottom, simply install and run byobu. It is a fantastic tool that can be configured to show different information by pressing f9. It also acts like (and is built on top of) the 'screen' tool, allowing you to run lots of terminal processes which wont stop when you close your terminal (with cntrl-a-d).
You can even name your terminals by pressing f8 which is very useful. To add another screen, simply press f2, and to cycle around them, press f3 and f4 (cycle forward/backward).
I hope that helps.
Nice, thanks a lot! Time to pimp my terminal even further ;-)
DeleteThis comment has been removed by the author.
ReplyDeletehey thanks for the help!
ReplyDeletei did all the steps you done here , but am trying to connect from windows 7
now i did copy all the cert and keys to the windows 7 machine
am using secure point openvpn to do the connection but it fails in the end.
TLS error ! do i need to configure anything on the router or is there any further details for connecting from windows 7 machine. the two machines ping fine :) thanks
Is your computer behind any firewalls? Perhaps you need to open some ports?. I take it that you are using an openvpn application on windows 7 to make the connection as shown here:
Deletehttp://programster.blogspot.co.uk/2013/04/windows-use-openvpn-with-key-files-not.html
Hi there! Thanks for that great tutoril... It really must have taken you a lot of time and it's well structured! I did follow evey step ot it but i do have an issue: i can connect to the vpn (connect to my home network from another place) but i get assigned an address 10.8.0.10 and with that address i can't access anything in my internal home network that has internal IPs set to '192.168.1.0'. I can see i'm connected but i can't do anything else:( ! Any idea?
ReplyDeleteps. I installed the server on an ubuntu server and i'm accessing it thru a windows 7 machine.
thanks for your help.
Hi again,
DeleteI just discovered that the only way to fix this is to correct the server.conf file but i'm not sure about all the value that should be changed to achieve that. What i'm trying to do is to be able to access to any resources located inside my home LAN. The local/home LAN as i mentioned is on 192.168.1.0 and my router/gateway is @ 192.168.1.1. Do you know which field i should change?
I do not know how win7 works, but here on ubuntu, when I set up the vpn, I create a 'tunnel' networking interface which is called tun0, which is assigned the 10.0.0.x address. I can still access my resources on my local lan at local lan speeds through my eth0. The network IPs that you use are the same ones I use (192.168.1.x for my local lan). When you perform an ipconfig do you not see multiple network interfaces?
DeleteI think we have the same architecture except that instead of accessing the vpn thru a linux machine i am accessing it thru win7 machines. But just to make a long story short, i have the vpn server setup on an Ubuntu server 12.04 (a virtual machine). But now i'm a little bit confused... My VM (the one that is running the vpn server) is only setup with one network card set to bridge mode... Should i had another one or should i change the network settings of the VM? You mentioned that your internal network is also 192.168.1.X as mine is but what get me confuses is that i really don't see anywhere in the config files or fwd ports where the 192.168.1.X is taken into account... I taught that i would need to make some changes on the server.conf on the server side but now i'm completely loss... Help needed ;)!
DeleteStuart when you say that "you can still access your resources on you local lan" Are you talking about accessing those resources being outside your lan or being inside but securely? I'm trying to access my home resources when i'm outside thru internet and since there is no where in the config my local lan is mentioned i am quite a bit confused...
DeleteAh ok, sorry riki, I had meant my local resources from inside the lan, rather than outside the lan. TBH I have never tried accessing the resources inside the VPN's lan, though this should be possible in theory and a large point of a VPN. I will experiment with this later.
Deletehi ... thanks for the tutorial, but I have problems connecting the server and the client
ReplyDelete"TLS error: Handshake ........"
maybe you can explain the solution to my problem
thank you in advance.
I just added step 25 where I update the tls variable paths. I apologize for having left that step out. I have a feeling that is what you need.
DeleteHi! I found your tutorial which helped me a lot and it was easy to follow directions from it. At the end I was able to successfully ping server from client, but cannot ping client from OpenVPN server. Are there firewall settings on client side or server side that could solve this problem?
ReplyDeleteThanks for any help,
Ivan
It's quite common for internet service providers to stop ping packets coming through to your home connection. I just tried to ping myself and it failed as well. Have you tried using SSH to gain access to your computer from your server (provided you set up port forwarding on your home network hub). Are you running Mac/Linux or the dreaded Windows OS at home?
DeleteThis comment has been removed by the author.
DeleteThis comment has been removed by the author.
DeleteIvan DJ,
DeleteTry setting the encryption algorithm to BF-CBC 128 bit as this offers best Windows client compatibility if you are running windows. I wrote a guide as well though a little different. Instead it uses Webmin + OpenVPN Module to easily setup and manage your OpenVPN server. Takes less than 15 minutes if you would like to try that way.
Guide is at >> http://www.ioflare.com/portal/knowledgebase/3/Install-Webmin-And-OpenVPN-On-Your-Ubuntu-Cloud-Server.html
Thanks Vance! I have taken the liberty of adding your comment to the tutorial itself.
DeleteThank you for this great guide. Is this for routed or bridged VPN? I'm really new at this staff.Thank you for your help.
ReplyDeletePretty sure the answer is "routed" from what I read here: https://community.openvpn.net/openvpn/wiki/BridgingAndRouting. This will set up a TUN in your network.
DeleteWe are manipulating packets so that those that are received are altered to appear as if they are originating from the machine. Perhaps someone else has a better answer.
Thank you so much . It will help me too much :)
DeleteHi Stuart,
ReplyDeleteThanks for adding my comment :) And yes you are correct this guide was for using TUN which is for a routed setup. I do plan to add a guide for a bridged setup in the near future though.
No problem! I welcome all useful feedback. If you send me a message/comment with your tutorial for a bridged setup, I will make sure to link/mention it in this post.
Delete