Showing posts with label docker. Show all posts

AWS + DCHP Docker Containers

Update - 1st March 2018

I just want to warn others that this post is quite old and I think there are probably much better ways of handling this now. A whole field has risen up around docker networking and tools are out there to make this much easier, such as docker swarm, Rancher and Kubernetes. I would recommend studying those areas instead. One of the easiest ways to get kubernetes up and running when you self-host may actually be through Rancher.


The default way of creating docker containers is to use a bridge with a host-only subnet provided by the docker0 or lxcbr0 bridges. However, this makes it incredibly difficult or impossible for containers on different hosts to communicate. This tutorial will show you how to deploy containers onto the same subnet as the host with DHCP or static IPs, so that you can deploy containers to any node, yet still have them communicate with each other.

We will be deploying onto AWS EC2 instances which requires us to NAT the bridge in order for our containers to be able to gain internet access. If you are not deploying to the AWS network, then you can skip all steps that involve iptables
    Create a network interface by going to EC2 -> Network Interfaces -> Create Network Interface.
    Assign it to the subnet you wish to deploy on, and choose a a single private IP. You will also need to choose a security group.
    When choosing a private IP, make sure to choose one that has a few IPs "around" it that are also spare. We will add these later so our dhcp server has a single ip "block" to dish out.
    Select the new network interface and click Actions -> Manage Private IP Addresses. Then add more IPs sequentially around the IP you chose in the previous step.
    Create an elastic IP and assosciate it with the lowest private IP on the newly created network interface.
    Create an EC2 instance (Ubuntu in this tutorial), and choose the subnet you chose earlier, before then being able to select the network interface you just created. Do not add the network interface in addition to the default one that is allocated. You should now get a message stating that you cannot be allocated a public IP. This is because a public IP from your elastic IPs has already been allocated to that network interface
    Log into your new EC2 instance and install docker and then install lxc.
    Update /etc/default/docker so that there is the line
    DOCKER_OPTS="-e lxc --dns 8.8.8.8"
    Replace the contents of
    /etc/network/interfaces.d/eth0.cfg
    with:
    # The primary network interface
    auto eth0
    iface eth0 inet dhcp
    
    auto br0
    iface br0 inet dhcp
            bridge_ports eth0
            bridge_stp off
            bridge_fd 0
            bridge_maxwait 0
    
    Run the following commands to set up routing:
    # bring up the bridge we just created
    sudo ifup br0
    
    # set up routing (aws specific)
    sudo iptables -t nat -F
    sudo iptables -A FORWARD -m state --state RELATED,ESTABLISHED -j ACCEPT
    sudo iptables --append FORWARD --in-interface br0 -j ACCEPT
    sudo iptables -t nat -A POSTROUTING -d 172.31.0.0/16 -j ACCEPT
    sudo iptables -t nat -A POSTROUTING -d 0.0.0.0/0 -j SNAT --to-source $HOST_PRIVATE_IP
    
    Using masquerade instead of SNAT will not work, so don't try!
    172.31.0.0/16 was my internal subnet for the AWS VPC, however it may not be for you.

    If you one of your containers is acting as a reverse proxy, you will want to run append these commands as well.

    Run the following commands to enable forwarding.
    echo 1 > /proc/sys/net/ipv4/ip_forward
    
    SEARCH="#net.ipv4.ip_forward=1"
    REPLACE="net.ipv4.ip_forward=1"
    FILEPATH="/etc/sysctl.conf"
    sed -i "s;$SEARCH;$REPLACE;" $FILEPATH
    
    sudo sysctl -p
    
    If you want to deploy your containers with dynamic IPs then install and configure dnsmsasq to act as our DHCP server for the node
    sudo apt-get install dnsmasq -y
    sudo mv /etc/dnsmasq.conf /etc/dnsmasq.conf.bak
    sudo vim /etc/dnsmasq.conf
    
    Replace the contents of
    /etc/dnsmasq.conf
    with:
    interface=br0
    dhcp-range=$STARTING_PRIVATE_IP,$ENDING_PRIVATE_IP,12h
    dhcp-option=3,$PRIVATE_IP_OF_HOST

    No DHCP Configuration

    If you don't want to use DHCP, then you simply need to start your containers similarly to below (but you will need to keep track of the IPs of every container)

    docker run \
    --net="none" \
    --lxc-conf="lxc.network.type = veth" \
    --lxc-conf="lxc.network.ipv4 = $IP_OF_CONTAINER/$CIDR" \
    --lxc-conf="lxc.network.ipv4.gateway = $HOST_PRIVATE_IP" \
    --lxc-conf="lxc.network.link = wan" \
    --lxc-conf="lxc.network.name = eth123" \
    --lxc-conf="lxc.network.flags = up" \
    -d $IMAGE_ID
    

    Restart dnsmasq for the changes to take effect
    sudo service dnsmasq restart
    If you run out of IPs because they are all currently leased to containers that didn't shut down gracefully, you can just empty the leases file is at:
    /var/lib/misc/dnsmasq.leases
    If you are using DHCP for your ubuntu containers, you will need to add the following line to your dockerfile [docker bug report]
    RUN mv /sbin/dhclient /usr/sbin/dhclient
    Now start your container similarly to below:
    docker run \
    -d \
    --privileged \
    --net="none" \
    --lxc-conf="lxc.network.type = veth" \
    --lxc-conf="lxc.network.link = br0" \
    --lxc-conf="lxc.network.flags = up" \
    $IMAGE
    
    Your container will need to automatically run the command
    sudo dhclient eth0
    to grab an IP from the DHCP server. I have this in a startup script that is called from the CMD option in the container's dockerfile and use
    cron -f
    as the last line in the startup script to "tie up" the container's foreground process.
    Your container should now have one of the private IPs that you allocated the network interface earlier. It should also have NAT'd internet access.

Docker - Implementing Container Memory Limits

If you are running multiple containers on a single host, the one may want to implement memory limits on the containers to reduce the likelyhood that any single container having a memory meltdown and causing issues on the host. Here's how.

This tutorial was tested on an Ubuntu 14.04 64bit hardware virtualized t2 micro instance in Amazon Web Services

Steps

One can implement memory limits on containers by simply adding the following option when starting the container:

-m="$number$optional unit"
Unit can be = b (bytes), k(kilobytes), m(megabytes) or g(gigabytes).

However, you are likely to get the following error message when you do so for the first time:

WARNING: Your kernel does not support swap limit capabilities. Limitation discarded.

This can be resolved by getting your kernel to allow memory accounting with the following commands. Its probably easier to just execute them as a script.

SEARCH='GRUB_CMDLINE_LINUX=""'
REPLACE='GRUB_CMDLINE_LINUX="cgroup_enable=memory swapaccount=1"'
FILEPATH="/etc/default/grub"
sudo sed -i "s;$SEARCH;$REPLACE;" $FILEPATH
sudo update-grub
echo "You now need to reboot for the changes to take effect"
After executing the script you will need to reboot the computer. You only have to perform this configuration once.

References

Dev Inside A Docker Container With SSHFS

Many of you may have already discovered Docker, but have been put off using it due to the prospect of it killing your development cycle because you are rebuilding the container after every change.


We are going to address this by mounting the files directly within the container with SSHFS. This will allow us to make changes in our IDE or text editor, and see them take place immediately inside the container, removing the need to keep rebuilding.

Prerequisites

This tutorial assumes you already have a built container (or a way to build one) and a "project" consisting of a codebase, such as a website. It also assumes that your codebase is on a Linux host that you want to share from. I will be using an Ubuntu 14.04 container, but the theory should also apply to other Linux OS types.

If you are a Windows user, you could use Samba to sync to a linux host, and then use that one for this tutorial
    Start your container with the
    --privileged
    flag added to the
    run
    command. I don't know what options/switches you already have, but you just need to add this one to the list.
    Enter the running container. For this I use lxc-attach, but there is also a fantastic tool called docker-enter on github that you can use, which means you don't have to be running LXC for the container engine.
    Run
    apt-get install sshfs -y
    from inside the container.
    Create a folder where you wish to mount your codebase. This may want to replace any existing code that was imported into the container when it was built, in which case remove everything from inside that folder.
    Run the following command:
    sshfs -o allow_other $USER@$IP_OF_CODE_HOST:/full/path/to/codebase /path/to/mount
    The allow_other part is to allow other users within the container, such as www-data to be able to access the files
    That's it! Any changes you make to your codebase are immediately changed in the docker container. This allows you to use docker as an easy/quick way to get a development environment up (like Vagrant)!

Docker Deployments Done in a Doddle

Once you have your own docker registry set up for your containers, deployments can be made automatic, quick, and easy. I do this by having my docker hosts constantly "polling" the registry through the use of a cron and an extended version of the script below. When the registry container is different from the running continer, the update_container function is called. Alternatively, you could have the script triggered by an API request instead.

This is a very simplified script that is only meant to get you started. This example uses a container that is "pushed" to: registery.my-domain.com:port/my-awesome-project
<?php

define("REGISTRY", "registery.my-domain.com:port");


function update_container($project_name)
{
    # define your update/replacment steps here...
    # perhaps just something like:
    # shell_exec("/home/programster/$project_name/update.sh");
    # where update.sh has a call to docker stop, and docker run commands.
}


/**
 * Checks to see if the project's container is out of date and calls the
 * update function if it is.
 * @param string $project_name - the name of the project we are checking
 * @return void - calls the update function if out of date.
 */
function version_check($project_name)
{
    $json_response = file_get_contents("http://" . REGISTRY . "/v1/repositories/" . $project_name . "/tags");
    $obj = json_decode($json_response);
    $latest = $obj->latest;

    $json_response2 = shell_exec('docker inspect "' . REGISTRY . '/' . $project_name . '"');
    $obj2 = json_decode($json_response2);#
    $current = $obj2[0]->Id;

    if ($current != $latest)
    {
        print "calling update on $project_name" . PHP_EOL;
        update_container($project_name, $ip);
    }
}

version_check("my-awesome-project");

Now whenever you build and push a container to your registry, it will automatically replace the currently running container within moments.

Run Your Own Private Docker Registry

This post has moved to here.

Ubuntu - Reverse Proxy Dockerized Websites

This post has moved. You will be automatically redirected in 3 seconds.

Docker - Run Multiple Docker Websites On The Same Host

Problem

One cannot run multiple containers that use the same port, on the same host. This problem has bothered me ever since I started using docker (way back when it was version 0.7). This is a big issue for me since most of the projects I work on are web applications which all want to use port 80/443 by default, and I can't expect my users to remember to manually specify random port numbers at the end of the URL.

Updated Solution

Go here to get a more up-to-date and better solution than the one outlined in this post.

Solution

We are going to provide each container with their own public IP address on the same subnet as the host.

Since IPv4 addresses are becoming sparse, this will not work on Amazon/Rackspace/Digital Ocean where they only allow 1 public IP per virtual machine. If this is only for websites, you need to use a website reverse proxy instead.

Steps

Create a Bridge

Bridges are like routers, except that they redirect packets based on the MAC address rather than the IP address. This is great because it means we are not going to have to create forwarding rules in iptables for each IP of the docker containers.

editor /etc/network/interfaces

Make it look something like below.
auto eth0
iface eth0 inet static

# bridge for the docker containers network to connect to main
auto wan
iface wan inet static
        address [HOST IP HERE]
        netmask [NETMASK HERE e.g. 255.255.255.0]
        gateway [GATEWAY IP e.g. 192.168.1.1 or 192.168.1.254]
        dns-nameservers [nameserver IPs e.g. 8.8.8.8 8.8.4.4]
        bridge_ports eth0
        bridge_stp off
        bridge_fd 0
        bridge_maxwait 0
You may need to change eth0 to eth1 etc if you have a different setup
You can call your bridge something other than
wan
, just make sure to take that into account in the rest of the tutorial.

Create Docker Start Script

Normally when you deploy a container, it is something like below which can be easily typed into the terminal:

docker run -d -p 80:80 [my-image]
However, you will need to use the following configuration, so I suggest you create a script that you can call later.
docker run \
--net="none" \ \
--lxc-conf="lxc.network.type = veth" \
--lxc-conf="lxc.network.ipv4 = [docker container ip]/[cidr]" \
--lxc-conf="lxc.network.ipv4.gateway = [gateway ip]" \
--lxc-conf="lxc.network.link = wan" \
--lxc-conf="lxc.network.name = eth0" \
--lxc-conf="lxc.network.flags = up" \
-d [Docker Image ID]
You can change eth0 to be somethng like eth123, it won't make any difference. It just means that your interface will appear as eth123 from inside the container.
My example:
docker run \
--net="none" \ \
--lxc-conf="lxc.network.type = veth" \
--lxc-conf="lxc.network.ipv4 = 192.168.1.25/24" \
--lxc-conf="lxc.network.ipv4.gateway = 192.168.1.1" \
--lxc-conf="lxc.network.link = wan" \
--lxc-conf="lxc.network.name = eth123" \
--lxc-conf="lxc.network.flags = up" \
-d `docker images -q | sed -n 1p`
The above will create a container that is publicly accessible at 192.168.1.24

You no longer need to worry about specifying ports, however you are going to have to keep track of your IP's which is easily done by creating a single deployment script per container that you want to run.

Virtualbox Debugging Note

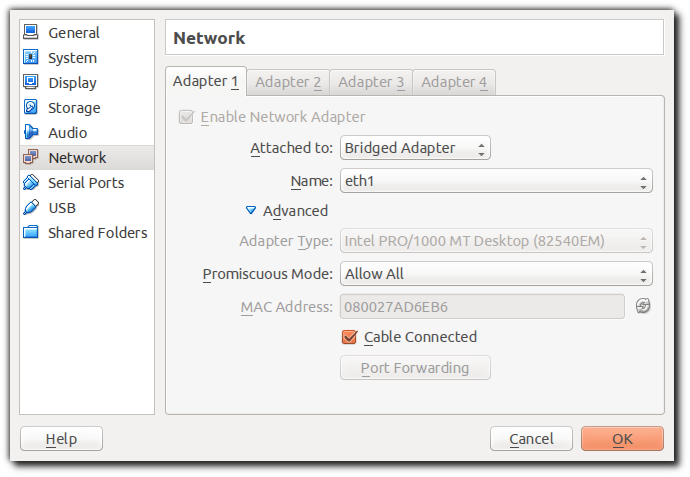
If you are testing this using a host within Virtualbox and you find out that your containers do not have internet access, please make sure that you have set up your network for the VM as follows (see the Promiscuous Mode setting):

References

Ubuntu Docker - Enter Running Container With Nsenter

Docker 0.11 has a new feature that allows direct host networking. Unfortunately this feature doesn't work when you set docker to use the LXC execution driver. Thus, I have found an alternative way to attach to a running container on Ubuntu, other than using lxc-attach.

This tutorial teaches you to use nsenter and not nsinit. I did initially try to use nsinit, but configuring it was not as simple (for me).

Steps

Compile the latest nsenter

#!/bin/bash
cd /tmp
curl http://bit.ly/1iLVbQU | tar -zxf-
cd util-linux-2.24

# Install the necessary tools to for make
sudo apt-get install build-essential -y

# Now compile!
./configure --without-ncurses
make nsenter

# Move nsenter into your execution PATH
sudo mv nsenter /usr/local/bin

Great, now you have nsenter. Here is a script I use to enter the first (and only) docker container I am running. I save it to "enter-first-container.sh" because it's a bit much to keep copy and pasting.

#!/bin/bash
CONTAINER_ID=`docker ps --no-trunc | sed -n 2p | tr -s ' ' | cut -d' ' -f1`
PID=`docker inspect --format '{{ .State.Pid }}' $CONTAINER_ID`
nsenter -m -u -n -i -p -t $PID /bin/bash

References

Install Docker on Ubuntu 14 EC2

If you just try to run sudo apt-get install docker on an ubuntu 14 ec2 instance it will not install correctly. Here is how I set up docker:

Install Generic Kernel

sudo apt-get install linux-generic -y
sudo reboot

Install Docker

sudo apt-get update && sudo apt-get dist-upgrade -y
sudo apt-get install curl -y
sudo curl -s https://get.docker.io/ubuntu/ | sudo sh

You may want to add the ubuntu user to the docker group so that they can use the docker commands without using sudo.

sudo usermod -a -G docker ubuntu
You need to log out and in again before this takes effect!

You may also wish to configure docker to use the LXC engine.

Ubuntu 12.04 - Set Docker To Use the LXC Container Engine

As of Docker 0.9, docker does not use LXC by default for the container engine. However, one may find it useful to do so, in order to attach to running containers with a new TTY.

Method 1 - Installation Script

Simply copy the following script into a file and execute it with

sudo bash my-script.sh
#!/bin/bash

# Ensure running bash not sh etc
if ! [ -n "$BASH_VERSION" ];then
    echo "this is not bash, calling self with bash....";
    SCRIPT=$(readlink -f "$0")
    /bin/bash $SCRIPT
    exit;
fi

# Ensure running as root user
USER=`whoami`

if [ "$USER" != "root" ]; then
        echo "You need to run me with sudo!"
        exit
fi

apt-get update && apt-get install lxc -y
echo 'DOCKER_OPTS="-e lxc"' >> /etc/default/docker
service docker restart

Method 2 - Manual Steps

    Ensure that you already have LXC installed by running the following command
    sudo apt-get install lxc -y
    Edit the /etc/default/docker file and adding "-e lxc" as shown below:
    Restart the docker service by running
    sudo service docker restart
    or by rebooting the server

References

Docker - Clean up Space

Update

The commands that were here have been moved to the docker section of the bash cheatsheet.

References

Docker - Working WIth Cronjobs

By now, you may have realized that running cron jobs in a docker container is not straight-forward. Here is how I managed to get cron jobs to work in my example container from a previous tutorial.

    First, we are going to create a startup script to be executed rather than packing more into the CMD of our dockerfile. This keeps things more "tidy".
    vim startup.sh
    This is my startup script, but you can alter it as you like.
    # Start the cron service in the background. Unfortunately upstart doesnt work yet.
    cron -f &

    # Run the apache process in the foreground, tying up this so docker doesnt ruturn.
    /usr/sbin/apache2 -D FOREGROUND

    The cron -f & command results in us manually running the cron service and placing it in the background. The cron service won't work on its own due to Docker issues with Upstart. We need to run it in the background so that we can start other processes.

    It is important that a process never stops runs in the foreground. This is because the docker executable exits as soon as the foreground process is finished, resulting in any changes in state being lost (e.g. any writes to files/internal database etc). In this example, I am running the cron in the background and the apache service in the foreground, but I could have done this the other way round, making sure to call the background processes before the final foreground one.
    Now create a file with all your cron jobs in it. I call it crons.conf, but you can name it whatever you want, as long as you update the future tutorial steps accordingly.
    vim crons.conf

    My example crontab file:

    * * * * * echo "echo 'crontab ran<br />';" >> /var/www/my_website/public_html/index.php

    We now need to update our Dockerfile build script so that the container image will have the cron package, an updated crontab from the cron file, and call the startup script we created when started. I am showing the entire script in case people haven't read the previous tutorial that this extends from.
    FROM ubuntu:12.04
    
    MAINTAINER [Docker username here]
    
    # Install the relevant packages
    RUN apt-get update && apt-get install apache2 libapache2-mod-php5 -y
    
    # Enable the php mod we just installed
    RUN a2enmod php5
    
    # Add our websites files to the default apache directory (/var/www)
    ADD my_website /var/www/my_website
    
    # Update our apache sites available with the config we created
    ADD apache-config.conf /etc/apache2/sites-enabled/000-default
    
    # expose port 8080 so that our webserver can respond to requests.
    EXPOSE 8080
    
    # Manually set the apache environment variables in order to get apache to work immediately.
    ENV APACHE_RUN_USER www-data
    ENV APACHE_RUN_GROUP www-data
    ENV APACHE_LOG_DIR /var/log/apache2
    
    # Install the cron service
    RUN apt-get install cron -y
    
    # Add our crontab file
    ADD crons.conf /var/www/my_website/crons.conf
    
    # Use the crontab file.
    RUN crontab /var/www/my_website/crons.conf
    
    # Add our startup script to the container. This script should be executed upon starting the container.
    ADD startup.sh /var/www/startup.sh
    
    # Execute the containers startup script which will start many processes/services
    CMD ["/bin/bash", "/var/www/startup.sh"]
    Now we need to build the image from the updated Dockerfile. Make sure to make a note of the "Successfully built [Image ID]" line as we will need the Image ID in the next step.
    docker build .
    Run the image
    docker run -p 80:80 [Image ID here] &
    I have used the & to run the process in the background, but you don't have to.
    That's it! If you want to go inside the container to check if your Cron jobs are taking effect, I recommend you Connect to the LXC container.

Docker - Enter a Running Container With New TTY

This post has moved.

Docker - Build Apache/PHP Image From Scratch

In this tutorial, we will build a docker image to deploy a simple website that was built with PHP. This can be easily extended by swapping your website into wherever we use "my_website" and updating the apache config part accordingly.

Steps

    Create an empty folder in which we are going to put all our files/configurations into for the image.
    mkdir my_new_image
    cd my_new_image
    The very first thing we need to do is create our directory structure for our website and the index.php file. Here we are just going to create a "hello world" index file within a public_html folder. Feel free to change "my_website" to be the name of your website, but you will need to do this for a few more steps below.
    mkdir -p my_website/public_html
    echo '<?php echo "hello world"; ?>' > my_website/public_html/index.php
    
    We are going to have to update the apache configuration to point to this site. The easiest way to do this is to create our configuration and then use this file overwrite the default one that comes when you install apache later.
    vim apache-config.conf

    Paste the following contents into the file before saving

    <VirtualHost *:80>
        ServerAdmin webmaster@localhost
    
        DocumentRoot /var/www/my_website/public_html
        <Directory /var/www/my_website/public_html/>
            Options Indexes FollowSymLinks MultiViews
            AllowOverride All
            Order deny,allow
            Allow from all
        </Directory>
    
    </VirtualHost>
    Now we need to create our Dockerfile. The dockerfile is a set of instructions that is used to build our image. Sort of like a kickstart/seed file.
    vim Dockerfile

    Paste the following instructions into the file

    FROM ubuntu:12.04

    MAINTAINER [YOUR USERNAME HERE]

    # Install the relevant packages
    RUN apt-get update && apt-get install apache2 libapache2-mod-php5 -y

    # Enable the php mod we just installed
    RUN a2enmod php5

    # Add our websites files to the default apache directory (/var/www)
    ADD my_website /var/www/my_website

    # Update our apache sites available with the config we created
    ADD apache-config.conf /etc/apache2/sites-enabled/000-default

    # expose port 8080 so that our webserver can respond to requests.
    EXPOSE 8080

    # Manually set the apache environment variables in order to get apache to work immediately.
    ENV APACHE_RUN_USER www-data
    ENV APACHE_RUN_GROUP www-data
    ENV APACHE_LOG_DIR /var/log/apache2

    # Execute the apache daemon in the foreground so we can treat the container as an
    # executeable and it wont immediately return.
    CMD ["/usr/sbin/apache2", "-D", "FOREGROUND"]

    Now we can use the newly created Dockerfile to build our image.
    docker build .
    That should
    docker build .
    The previous step should result in the terminal outputting something like:
    Successfully built [Image ID here]

    Take that image ID and execute it like so:

    docker run -p 80:80 [Image ID here]

    The -p 80:80 ensures that the containers port 80 is mapped to the hosts port 80. If you dont want to be left watching the apache log output, then simply stick an & on the end of the command
    That's it! You should now be able to see a "Hello World" message when you navigate to the IP of the docker host in your browser. e.g. something like http://192.168.1.87/

References

Docker Resources

This post is not a tutorial, but whilst I am still learning to use Docker, I thought it may be useful to create a page with links to all the useful resources.

Resources

Getting Help

If you have a question or problem when using Docker, there are a number of different ways to ask for help.