Introduction
This tutorial aims to get someone who is completely new to Symfony2 setup with a very basic REST API with Symfony, from scratch, as quickly and as simply as possible.
Steps
Defines
Firstly, register some variables in your shell that we will use throughout this tutorial
# Specify a name for your project
PROJECT_NAME="test_project"

# This should be the name of your organization, or your personal pseudonym
USERNAME="Programster"

# This must end with "Bundle" and use Camelcase
BUNDLE_NAME="DemoBundle"
Run the following commands to create a project
mkdir $PROJECT_NAME
cd $PROJECT_NAME
curl -s https://getcomposer.org/installer | php
sudo php composer.phar create-project symfony/framework-standard-edition ./$PROJECT_NAME '2.5.*'
mkdir: permission denied
Answer the Questions
At this point it will ask you a series of questions. I elected to NOT install the Acme demo bundle and use the mysqli database_driver. When the secret option comes up, make sure to create something new and write it down for now
.png)
sudo chown -R $USER:$USER $PROJECT_NAME
cd ./$PROJECT_NAME
Run the following commands to include some relevant bundles
composer require jms/serializer-bundle @stable
composer require friendsofsymfony/rest-bundle @stable
Create A New Bundle
Run the following command to create a new bundle
php app/console generate:bundle
$USERNAME/$BUNDLE_NAME
Press return three times to use the defaults for the questions that come next.
Bundle Namespace:
Bundle name:
Target directory:
For configuration format, I chose php. Then choose no to generating the whole directory structure and choose yes to confirm generation. Confirm automatic updating of your kernel and routing.
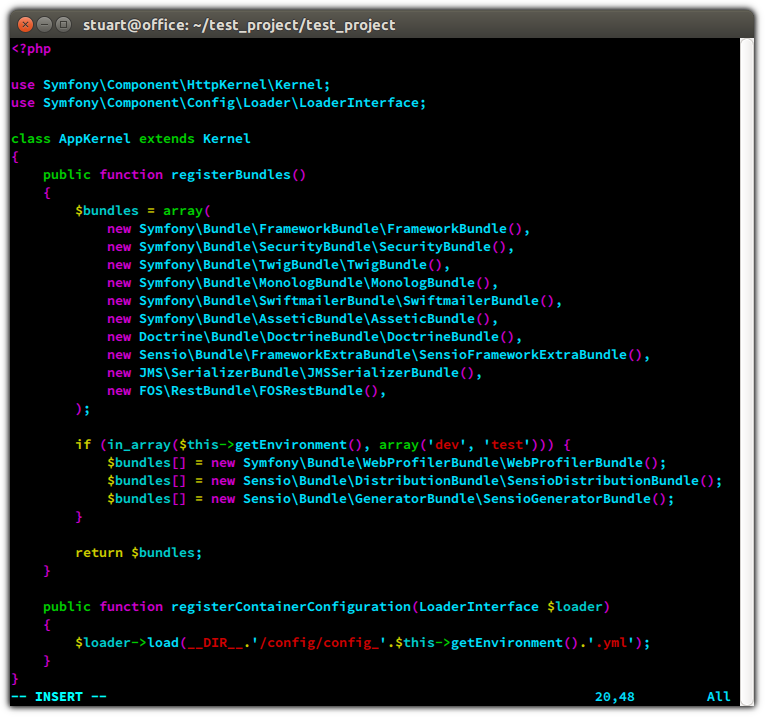
Register the bundles with Symfony.
editor app/AppKernel.phpAdd the following two lines to the bundles array
            new JMS\SerializerBundle\JMSSerializerBundle(),
            new FOS\RestBundle\FOSRestBundle(),
Your file should now look similar to the one below:
Create A User Entity
cd src/$USERNAME/$BUNDLE_NAME
../../../app/console doctrine:generate:entity
Answer the Questions:
- The Entity shortcut name: $USERNAME$BUNDLE_NAME:User
- accept annotation as the configuration format
- Add the following fields
- username string 255
- password string 255
- email string 255
- Press return to stop entering fields
- Press return to use "no" for "Do you want to generate an empty repository class"
- Press return to confirm generation.
Define Configurations
Run the following command to append to the end of your config.yml file.
echo "
sensio_framework_extra:
    view: { annotations: false }
    router: { annotations: true }

fos_rest:
    format_listener:
        rules:
            - prefer_extension: false
    view:
        view_response_listener: true
" >> ../../../app/config/config.yml
Define Our First Controller
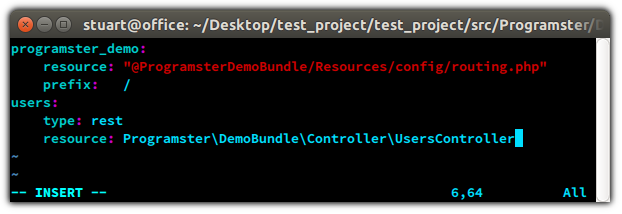
editor ../../../app/config/routing.ymlAdd the following:
users:
    type: rest
    resource: $USERNAME\$BUNDLE_NAME\Controller\UsersController
editor Controller/UsersController.php
<?php

namespace $USERNAME\$BUNDLE_NAME\Controller;

use Symfony\Bundle\FrameworkBundle\Controller\Controller;
use FOS\RestBundle\Controller\Annotations\View;

class UsersController extends Controller
{
    public function getUsersAction()
    {
        $users = $this->getDoctrine()->getRepository('$USERNAME$BUNDLE_NAME:User')
                    ->findAll();
        return array('users' => $users);
    }
}
Test It's Working
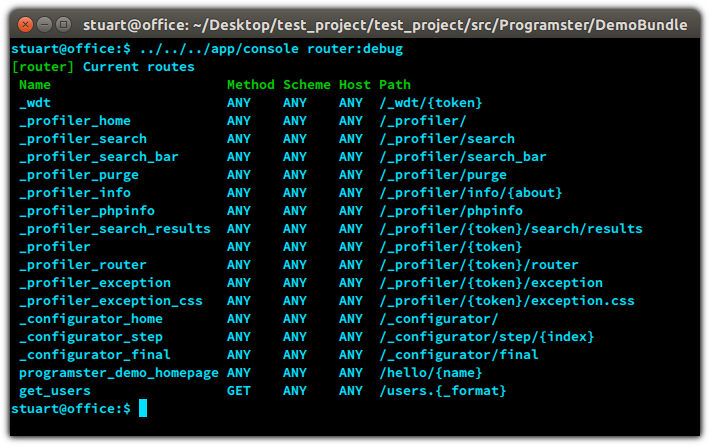
Run the following command to check that all of your routes/configurations are set up correctly with the following command:../../../app/console router:debugYou should see output similar to below:
That concludes the first part of the tutorial. I will add a link to the second part as it becomes available.
No comments:
Post a Comment